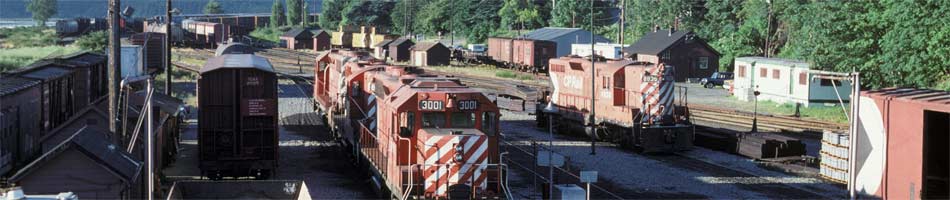
My first curved turnout!
Here’s my first curved turnout, in place for the National Silicates spur at Parksville. And yes, the inside curve is indeed the main track…
September 27, 2011
Last night saw some free time, decided to head downstairs and see what I could do. After much deliberation between building curved turnouts and dropping feeders, I decided on the latter. All the trackage secured within the Parksville area is now soldered together and feeders connected to the track. Didn’t quite get to connecting them to the bus however…
September 26, 2011
Apologies for the lack of posts over the past little while.
Admittedly, not a whole lot of stuff going on other than things taking up weekends (GETS in Edmonton, Railway Days at Heritage Park, good weather and obviously taking advantage of it before snow flies.) to get stuff done.
However, a few bits to report on:
- A restock of Code 70 ME flextrack arrived, so I’ve got enough to lay trackage on the visible portions of the peninsula.
- We’ve secured the trackage in the Parksville yard. I’m also getting a fair number of feeders wired for that trackage as well, including the port sub trackage on the middle deck.
- I’ve built a few Bullfrogs, now that I know how to make them work effectively (ie: take some of the spring out, wax the moving friction bits and voila. Works wonderfully.) I’ve also installed two of them – one at south siding switch Mud Bay and at the Ballast Spur just south of that.
- I’ve acquired and received a few more bits from FastTracks, including an assembly fixture for doing the curved 30″/40″ #8 turnouts and a few more quicksticks. As a result, getting trackage laid through the Parksville industrial area will be happening soon and we’ll be able to connect a few more bits of trackage together. (thinking south of Bryn all the way through to where the port sub enters the helix!)
- We’ve got another piece of backdrop installed, so most of Parksville has a backdrop installed. We are learning that the “Murray school of glue” is desirable here. For those who don’t know, Murray is one who figures that if it’s worth doing, it’s worth OVERdoing. Thus, his glue applications tended to be quite excessive. The backside of the masonite is quite rough owing to the manufacturing so the excessive glue is better to ensure a good bond.
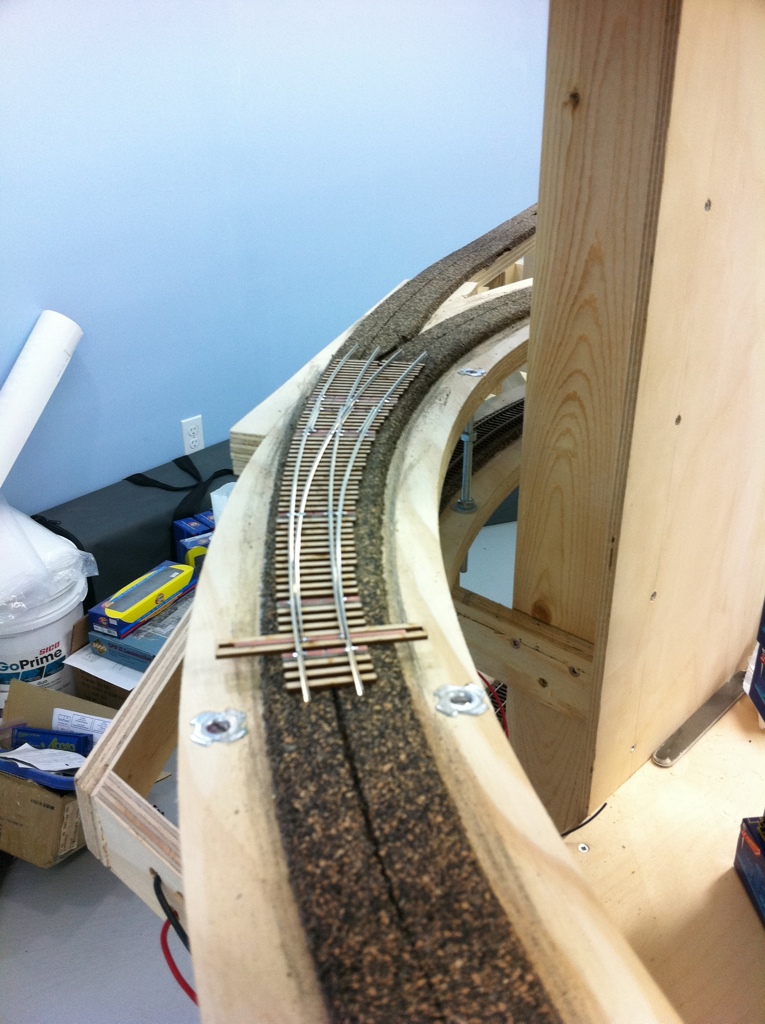
Port Sub trackage

Tracklaying for the Port Alberni subdivision and backdrops are visible here. The turnout at the front is the junction switch for the Victoria and port subs.
September 4, 2011
Cam has recently been on my case to get backdrops in much sooner than later…While I was (and still am in some respects) reluctant to see why it’s now a “MUST DO NOW” thing, I went along with it as it’s going to be needed sometime and there is some benefit to having them in before anything fragile can get damaged.
Timing was also good for Dan too, as he had some cleanup duty recently at a store which had protected it’s new floor with full 4×8 sheets of masonite. Now that the store is about to open, they needed to get rid of the masonite. Since the material wasn’t screwed into, placed face down on the floor, and in otherwise very usable condition, I readily agreed to accept a few sheets that would’ve otherwise gone into the dumpster. Score! (hint: It’s a good thing to have a friend in the demolition business!)
Lured by fresh cinnamon rolls, Dan and Cam came over late this morning to get going on the backdrop installation. Dan showed up first with the masonite which we manhandled through the basement window and into the basement. This task will certainly be far more difficult once we start putting the shelves up around the walls!
Cam came over shortly after I finished moving the test train into the helix where it’s less likely to be knocked around (and potentially onto the floor!) and we got to work with measuring and cutting the masonite. Many measurements and cuts with a circular saw, we found that 3 full sheets of 4×8′ masonite wasn’t enough to do all the backdrops on the middle and lower decks!
Owing to the great weather outside, we called it quits after that and went railfanning – Scored a lucky break and managed to catch a CN Freight in the evening heading out to the Louis Dreyfuss elevator at Lyalta on the Drumheller sub – headed by an SD40-2W and GP38-2W!
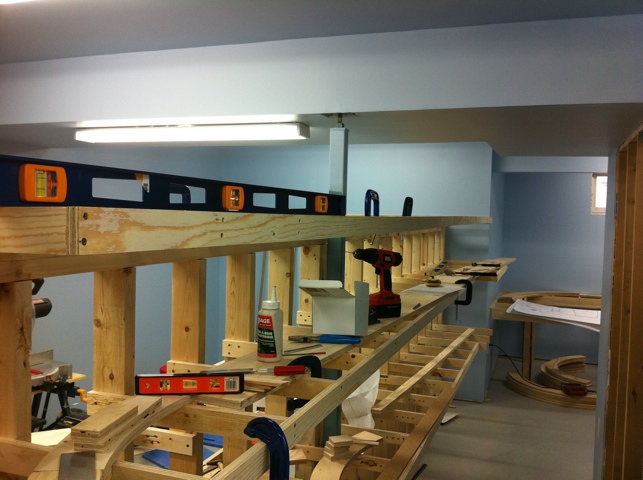
Parksville trackage!
We’re getting quite close to having no code 70 track left to install, now that Parksville and the trackage on the port sub is ready for permanent installation.
July 31, 2011
Dan called this morning, saying he’d like to come over. I of course agreed and shortly after noon (only slightly delayed), he arrived and we got some wiring work done. He works for a demolition company and managed to salvage some good lengths of red, black, blue and white 12-14 gauge solid wire and donated them to my cause. So after ensuring all the wiring chase holes were drilled, we got to work on installing the wiring into the lower deck and the middle deck (despite the fact there’s no trackage installed yet).
Afterwards, the feeders were installed from the track and hooked up to the bus wire.
Cam arrived during this point and continued working on the trackage towards Buckley Bay. Mud Bay siding was completed as was a good portion of the trackage between what will be Buckley Bay and Mud Bay (around the base of the peninsula)
Afterwards, I fixed up a turnout – forgot to cut isolation gaps and install guard rails on the turnout at North Siding Switch Mud Bay – and then we hooked up the power pack to the bus wire. And then began the fun! Dan got the honours of running a really long train from the helix down to Mud Bay and beyond. Given the fact the train was way over length for the siding, we had some fun working the train back and forth to get the locomotives by all the cars and then back into the helix with the caboose on the tail end.
I now know that I need to get a fair number of couplers replaced as those crappy plastic couplers just don’t hold up to anything in the way of strain. Not that was any new knowledge in my opinion…I knew I needed to, but the need for work to the fleet of cars I’ve been acquiring over the years will now need to happen sooner than later…
Cheers!
Jon
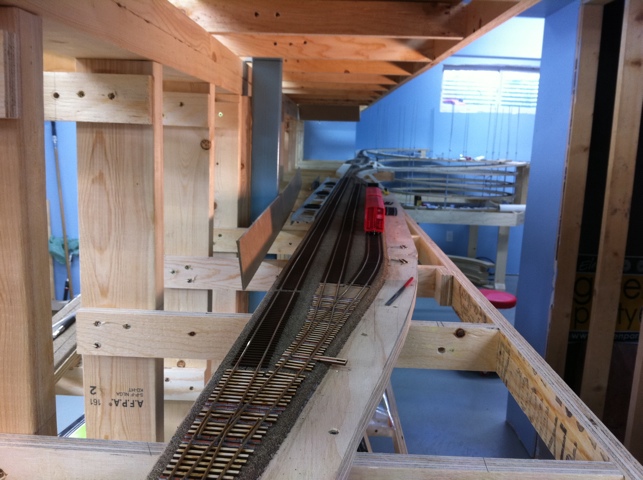
Testing freight on newly laid trackage
Cam and I assembled a good port alberni freight to test the helix. Successful!
July 30, 2011
Cam called this morning, invited me over to his place to review the drawings. A couple revisions and will get them scanned and posted to the website shortly. Then off to Home Depot for more plywood – a selection of 4″ and 6″ wide strips. Back to my place to get some stuff done. Cam worked on getting all the cork sanded and then started in on trackwork.
Doug S. came over shortly after to discuss with me the control panel for the Free-mo’s yard control panel and its design. Once that was all figured out we all went for lunch.
When Cam and I got back, more trackwork. For me, that meant prepping the fast tracks turnouts for install… Gluing on the quicksticks, cutting the isolation gaps for the frogs and electrically testing them for continuity (or more properly, lack therof). Cam installed the trackage on the lower deck, connecting into the helix and working towards Mud Bay.
I’m happy to report we have two turnouts installed! After we spiked down half of the main and siding at Mud Bay, we called the tracklaying to a halt (owing to tired butt syndrome) and grabbed some extra rolling stock, a couple more locos and tested a port freight up the helix. For the most part, a success!
Pictures to come…
Cheers!
Jon
July 29, 2011
I suppose this post will also end up including stuff done last week as well as tonight. Apologies in advance for any potential confusion…
While Cam waits ever so patiently for me to finish building the two curved #8 turnouts for the south Parksville industrial spurs, we managed to get the subroadbed built and installed for Mud Bay siding and then all the way around the peninsula, ending just shy of Buckley Bay. Nice thing with this is the fact we incorporated a grade into the hidden portion of the trackage and managed to do it without introducing reverse superelevation like we did with the hidden loop of track in the peninsula helix. We were concerned we’d have to go with ready rod on all three decks because of that, but we found a solution: pre-stress the pieces and voila! We’re level, just how we wanted it!
Over the past few nights on my own, I’ve been laying down cork on the fixed portions of benchwork, polishing off the first of what I’m sure will be many boxes of Midwest cork. Turnout areas are fun… Thank goodness “ballast hides a multitude of sins!”. I’m still really impressed with using contact cement for this task!
Cam has also been puttering away at the trackplans, adjusting things here and there for the changes we’ve introduced. He’ll be showing them to me tomorrow for approval and then we’ll get them scanned in. I’ll post them on the trackplans page once I get the PDF’s.
We also found a few pictures posted on the railfan.net vancouver island forum of the Vancouver Island Gas spur from 1986. Picture an LPG tank parked at the bumper post on top of a trestle two stories up… We are most thankful for the interesting vantage of this industry and we’ll be trying our best to model this spur accurately. And when it comes to spotting cars there, the crews will definitely not be allowed to kick the car down to the trestle!
As I’m on my own for the next couple weeks, I’m hoping to get a decent amount of work done… I suppose I should head back down and see what I can do…
Cheers,
Jon
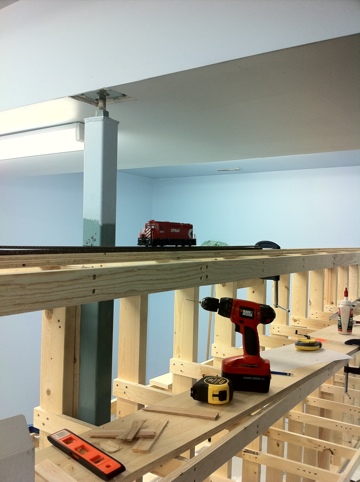
Look ma! No headknocker!
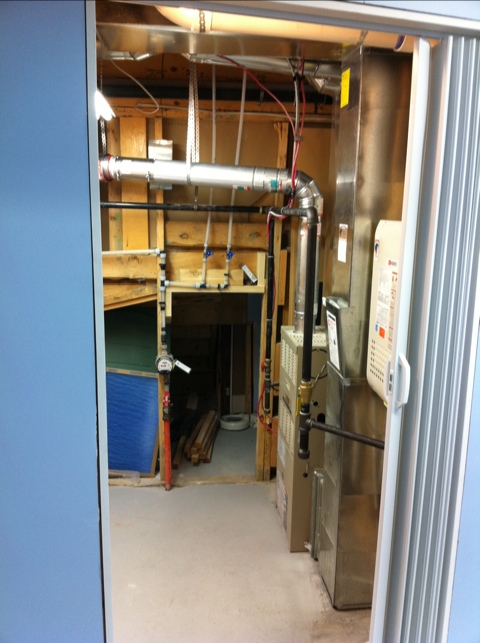
And the hot water tank is headed for the scrapyard (where I’m told they’re worth maybe a couple dollars) and I now have a clear entrance into the utility room where the staging yard will be. Maybe not as extreme as plans my friend Grant Eastman has for his basement (he is likely redoing the stairs into his basement for additional layout space) but at least it’s a move to improve our home and my crew’s comfort with operating this layout.
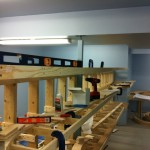
Lower deck, Mud Bay
This hopefully illustrates the concept I was talking about with the trackage just south of Bryn ducking behind the backdrop, just underneath Parksville. Under the curved benchwork is the ballast spur off the Victoria sub just south of Mud Bay. The mainline is just to the left.
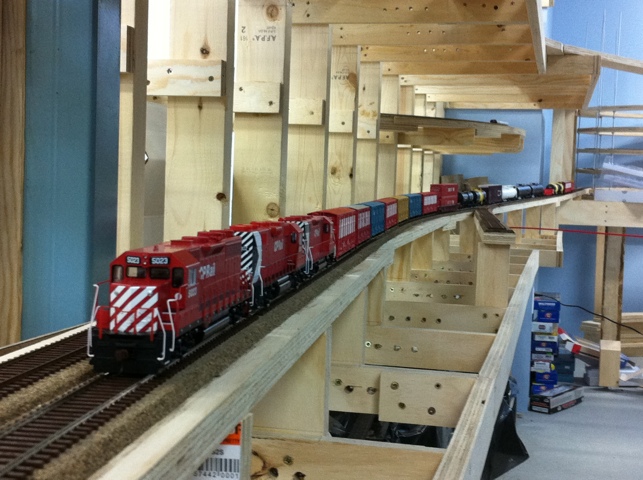
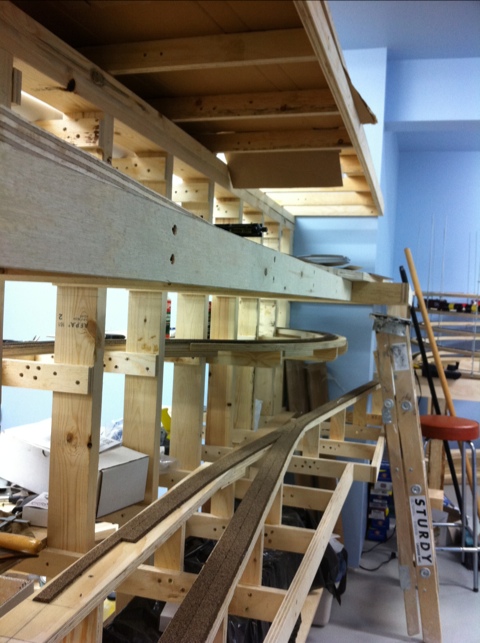
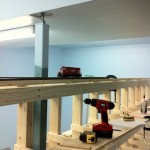
Main Helix
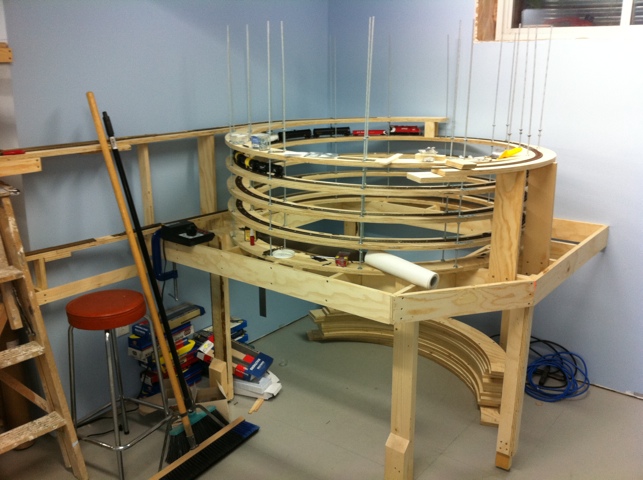
So far, the main helix is the longest installed trackage. What you’re seeing here is the lower half of it, running from just north of Parksville (front is the Victoria sub, back side is the Port sub) down to just south of Mud Bay. Grade is around 2.4%, and the GP35 at the far back can pull nine plus cars unassisted at only 30% power up the grade. The connection from Parksville to the summit of the Port sub will be occupying the upper portion of the ready rod.
Last day of hot water tank!
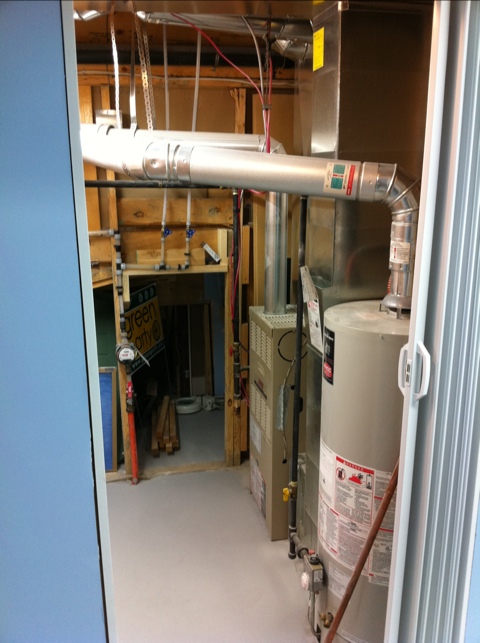
That flue you see coming from the top of the hot water tank is a real headbanger. Today is also it’s last full day as I’m having the entire hot water tank removed and replaced with a tankless hot water heater tomorrow.
July 18, 2011
Found the house to be way too hot when I got home this evening. After a meager dinner, decided to head down to the basement as I figured it’d be cooler than upstairs where I would otherwise spend my evening.
I was right. Numerous degrees cooler. (or as Jason Shron would say – absolute zero).
Got to work on putting cork down on the bits of secured benchwork installed yesterday. Have I mentioned how much I like using contact cement for application of cork to the subroadbed?
Also took care of a couple other bits of benchwork as well.
Now to bed where it’s still too warm…
July 17, 2011
Been a little while since anything of substance has taken place in the basement, and I blame it on desires to get outside and to also get out of the city. The camping trip to Waterton was great as was the shopping in Kalispell.
But after no progress in several weeks, I wanted to get something done. While I’m still working on getting a curved turnout built, I figured other benchwork could be worked on.
So Cam came over and we tested, drew track centres using the sweepsticks from fast-tracks and the secured the subroadbed for the trackage between Bryn and Nanaimo. As I mentioned in the last post, I decided to put this little bit of trackage out of main view to provide for a longer distance visually and physically to reinforce the fact Bryn isn’t exactly next door to Nanaimo’s outer reaches. So it’s a bit of a squeeze underneath Parksville, but we got it secured well enough.
Next up is the trackage out of the main helix towards Courtenay. Risers were cut, attached, track boards drawn on and then secured. We got mostly into the south siding switch of Mud Bay before we found the rolling stools a little hard to be sitting on for extended periods of time. Still glad we had them though!
Next weekend will be spent primarily cleaning up as next Monday sees my hot water tank being replaced with a tankless hot water heater. Aside from the gas bill going down a little bit, the biggest benefit with relation to the layout is the removal of a head-knocker of a flue from the HWT. No nod-unders going into the staging area!
I promise to post pictures soon, likely after things have been cleaned up!
June 25, 2011
I have two projects on the go right now in my basement. One of which is installing tortoises into the “centre crossover” section of Lindsay Yard for the Calgary Free-mo. The other project is the E&N, of course.
Dan called this morning and wanted to come over to do some work on the layout. When he got here, he found out about the first project and wanted to get some practice with wiring up tortoises. He’s likely installing a fair number of them on his layout when that gets going, and I didn’t see any reason why he couldn’t get some practice in now. So, with some advice, guidance and my tools, he got to work on those and voila. 8 tortoises ready for installation.
Cam came over a little after Dan started in on the tortoises and he and I got to work on the layout. Cam put in the last bits of cork on the Port Sub section on the middle deck, and then proceeded to grind the living daylights out of it to provide a level ramp off/on the cork for the transition from scenicked area to helix trackage which doesn’t have any cork. My Surform tool got quite a workout.
Following that, he got some trackage laid from the peninsula helix towards Parksville’s industrial area, only to find there were two concerns:
1) I didn’t have any micro-engineering joiners of suitable size. Apparently the code 83/100 Atlas rail joiners are just a little oversize for the code 70 track.
2) I didn’t have the curved #8 turnout for the Parksville team track built yet. At some point soon, I’ll tackle that project.
I did receive a full box of goodies from Fast Tracks via UPS earlier in the week and in it were 24 #6 quicksticks which I started making use of. Three turnouts are now virtually complete and ready for insertion into the layout after I spent the morning washing the turnout skeletons.
I also had a bit of a brainwave this morning and after explaining it to Cam and Dan, they readily agreed on the track revision. Northbound out of Wellington Siding, the trackage passes by ICG Propane and then curves again and into Bryn. Noting the mainline distance between Wellington and Bryn being well over 7-10 miles, I figured there should be a little bit more track between the two and used the space underneath the unloading ramp north of Parksville Junction to install a little more hidden trackage to increase the running length and improve the illusion of distance between the two places. Once Dan finished with the Tortoise wiring, we all got to work on getting the supports and subroadbed installed into place. The area formerly planned to be occupied by track will now likely be a whole ton of trees and perhaps a trail of some sort. We’ll see.
Also of note is the installation of the subroadbed and cork for Bryn. That’s all done now too.
Cheers!
I host a prolific manufacturer
Amazing what happens when things fall into place…
A few days ago I contacted Jason Shron of Rapido Trains to advise I had taken a couple days off work to help him out with his “Canadian on tour” while he was here in Calgary. He readily agreed to this and we met up a short distance from my work on Tuesday evening. Things got really interesting from there… To the point that he didn’t want to stay at the hotel he booked for himself and ended up accepting my offer of my guest room when all the other hotel rooms in Calgary were taken up. The full details are available first here:
And here:
You can see a couple pictures of me and the layout on Wednesday morning. While Jason’s writing makes it look like it’s all my work, nothing could be further from the truth… This layout is just as much Cam’s as it is mine… It just happens to be in my basement and built with my funds.
Thanks for coming out Jason, and you can come back anytime for a visit. Just make sure you bring warmer clothes. 🙂
And for the rest of you… Do order a Canadian set or two. He alludes to manufacturing an RDC model but it won’t happen unless sales of the Canadian are really, really good…
Cheers!
June 4th, 2011
Got up this morning, had breakfast, and went downstairs to do some cleanup, and to start building #8 turnouts. Got one LH built, which will end up either at the South Siding Switch of Mud Bay, or the Junction Switch at Parksville. In either event, it is needed much sooner than later.
Later in the morning, Cam came over and we got to work. Progress on the helix was already up to the point where we were at the midpoint, and needing trackage to get in and out of the helix from the middle deck of the layout. We had already cut the pieces of wood to graft onto the helix pieces, but ran out of time to get the other bits cut, secured, and whatnot to get them all working together. Today was the day to make that happen.
So, we got the Victoria Sub connection into the helix attached (after much test fitting and rasping to get a clean tight joint) with a couple splice plates made from Baltic Birch and plenty of glue (oh yeah, the other task from the morning was refilling the yellow carpenter’s glue bottle – works much better now!) and clamps.
While Cam was taking care of the dryfitting, I got the subroadbed boards for Parksville Yard and the Port Sub trimmed to a much better size, and looking really good. Once the connection piece into the helix was secured, we secured down the subroadbed boards with plenty of screws.
Following that, the connection to the Port Sub into the helix came in and after much debate as to the height of the helix, figured it was good where it was and secured it very firmly to the two walls it sits against. The thing is not moving at all! We can now start running track within Parksville and then into the helix and carry that up to the top. All I need to get done are a few more turnouts, cork laid, and then we can lay track, wire it up and perhaps have a bit of switching going on at Parksville.
Towards the end of the day, we liberated more than a few pieces of rolling stock from their boxes, including a CP Rail GP35, hitched them all together and ran them up the helix at around 30% power from the powerpack. No issues whatsoever, so I’m figuring if all works well, 3 locos should have no problems hauling 18 cars up to Port Alberni.
A great day for progress. Yes, I’m sure you’re wanting pictures. No, I haven’t taken them yet. Patience grasshopper…
June 3rd, 2011
Happy day!
Got an email from a good friend and fellow model railroader David Bedard. This guy does some pretty fantastic modelling, and after a brief stint in HO scale, went back to N scale. Still does some great decoder installations and full of other modelling goodness.
But that’s not why I’m writing about him tonight. No, tonight, I’m writing to say he found my Fast-Tracks #8 turnout assembly fixture! I’m needing it for at least 5 turnouts on the layout, two of which are needed much sooner than later. I’ve been almost literally turning my house and garage upside down trying to find this plate of aluminum without success and thinking I’ve lost it.
No, he had it, loaned to him quite some time ago when he wanted to borrow it for building some HO scale turnouts. He spent around 3 hours trying to find the point-form tool which I already had.
So, Michaelea and I went on a trip to NW Calgary to pay him, his wife and two daughters a visit. I got my assembly fixture, a couple others (#5 and #7 turnout assembly fixtures and point-form tools) which I wasn’t expecting, but grateful to have nonetheless, and Michaelea got to spend some time with young kids and Samantha. We also had a great time shooting the breeze and he showed off a #12 N scale turnout built with code 40 rail. Wow…Talk about tiny!
Lights…
One of the reasons for going with such short benchwork (depth-wise) was my choice of lighting. Pretty much from the get go, I decided I wasn’t going to use flourescent or incandescent light fixtures. Especially those with 110V AC required! I didn’t want to have to buy and install a sub panel onto my electrical circuitbreaker panel for the sole purpose of running lights. Nor did I want the added height such fixtures impose.
So imagine the smile on my face when I discovered LED Strips packing some 600 surface mount bright white LED’s into five meters worth of flexible material, on eBay for not even fourty dollars including shipping!
The two reels of them arrived on Friday from Hong Kong. Cam suggested we use my DC power pack and a multimeter to test out both voltage and current draw and we are both pleased with the results.
We even setup a few strips of track at Parksville pit our test equipment on them and then taped up the strips in position and voila! We’ll need to run two or three strips for adequate lighting but I did half expect that given Timothy Horton’s layout (he also gets credit for the idea of using LED’s) uses three strips for his n scale BCR Dawson Creek sub layout.
Another unknown off my checklist. I’ll raise a drink to that!
Work still progressing
So with Taxes (ugh), house cleaning and the various bits of other things that take up my time, I’m remiss with getting updates done. Oh yeah, and also a few other things like working on Murray’s home layout.
So far, we have completed four turns on the main helix, the majority of the benchwork for the peninsula is in place (Trackboards still need to be cut and secured though) and the amount of track laid has tripled from March. Of course, that’s easy to do when the helix chews up a lot of track going around and around and around… And unfortunately, Cam and I discovered my work with the 26″ radius 60° arc design was a little flawed. When the start of the helix construction came around, we discovered the shape didn’t match the 120° arcs and the ready-rod wouldn’t work due to lack of support on many of the inside holes. So they got pitched and we’ll need a few more 120° 26″ radius arcs cut. But we’ll likely have enough to connect Parksville with the lower deck, and at some point soon, we’ll be able to run trains from the middle deck to the lower deck. Not going very far mind you, but it’s still progress.
I’ve also started building the Code 70 turnouts for the visible portions of the layout. They’ll be needed in a hurry for the Parksville area.
And with that, I think I’m going to build a few more…
Updates still coming
I’m finding time I wanted to put updates into WordPress hasn’t quite materialized as I had hoped.
I’m still wanting to post details as to what happened in the three weekends early in March as there was certainly progress on the layout, but I just want to get this live.
Cheers!
March 26, 2011
In what’s sounding like a rather similar theme to the last few weeks, Cam again came over to push some more progress on the layout. Except we needed a bit of materials. Specifically, wider strips of 3/4″ ply. After some measurements in my Kia Rondo, it was determined that indeed, the car can actually hold strips of 8′ long materials. And thus, off to Home Depot to pick up a sheet and have it ripped into various lengths. A couple 6″ wide strips, a few 3″ strips and the balance in 4″ wide strips.
Why 4″ wide strips? Reason for them is for support of the Summit region of the upper deck. We constructed the usual grid of front and fingers together, but owing to the height of the upper deck, they ended up resting on top of the wall. Kinda tough to secure using screws through the web of the plywood as it would do nothing but split the wood. So, we backed the entire shebang with 4″ wide strips, and then secured everything to the back of the wall. The plywood will eventually be hidden behind trees and a mountainside. Some additional shims underneath the plywood fingers ensured we’re stable and level.
The upper deck is now definitely going to be in the range of 68″ from the floor. Awfully high up for those who aren’t of average-or-taller male height. I’m debating the inclusion of turnouts and other derailment prone trackwork that high up, but we’ll see.
-
- A GP35 at the summit
-
- Upper level benchwork in place
Recent Comments