June 25, 2012
Cam called early this afternoon, said he had taken a couple days off work so he could not be at work on his birthday (the 26th, happy birthday!).
Asked what I was up to, I replied that I was making dinner and then headed downstairs to do some work on the layout and invited him over to take in the fun. So he did.
We pulled rolling stock out of Parksville and sanded the cork to the MP25 trestle location and then proceeded to fit track for the remainder of the Arrowsmith storage track and a few feet beyond. The other switch was also put into place.
We would’ve spiked it down and soldered various bits but it was getting late by then and I called it a night.
I’ll get the track spiked down sometime next week and wire up the track to a yet-to-be-installed bus but I’m definitely needing to find some dough to enable some more purchases… Specifically track, cork, benchwork material, and of course those shelf brackets!
At least in the meantime I can run a train to Arrowsmith…
June 24, 2012
Didn’t do much over the course of the weekend than acquire some Peco rail joiners on Saturday, and try to apply some firmware updates to the DT402D throttle and the UR92. The former was successful, the latter…. Well, let’s say the upgrade downgraded the functionality to nil.
A message has been sent to Digitrax and I’ll hopefully find out soon whether I’m sending it on a vacation to Florida. I suppose it’s not a really bad thing as I’ve still got a couple throttles to send down for repair/upgrading…and I should get some more trackwork going too.
June 20, 2012
Fitted and spiked down two 3′ long sticks of Flex last night… One for the siding and one for the main connected to the east siding switch at Arrowsmith.
Debated whether I sand the cork to enable more track to be laid and decided to do that another time.
June 18, 2012
I debated on whether I should even post a note about this, and ended up deciding to go ahead.
Last night, after considerable searching for rail joiners, spiked down the east siding switch for Arrowsmith. I also got a couple lengths of flex prepared for spiking down.
That is all.
June 17, 2012
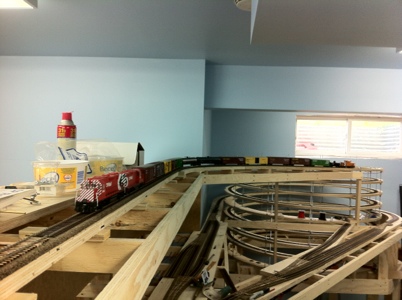
And there ya have it. After a very lengthy wait, we finally have a train at the current end of track – the east siding switch of Arrowsmith. The train of course made it up the hill under its own power, and made obvious the need to fully check the trip pins on the cars I’m running. A couple candidates are those which derailed on the way up on account of the screws holding the track down.
By the way, this is the first train to run on the layout in many months… So happy to hear those units once again.
June 14, 2012
Spent a little bit of time in the basement last night, working on finishing feeders and busses in the helix. Got the upper helix red wire completed, strung the black (and found that length of wire is about 4″ too short…) and finished off all the feeders to both track and their ready-rod connections.
During all this, I’ve got one of my older iPods playing music. One song came on that I didn’t care to hear, so out I went to remedy the situation. I stood up a little too early…
Ow. Ow. Ow.
The bridge from Parksville to the lower deck had (emphasis on had) a UP5 mounted to the bottom of it, screwed in on the top pair of holes. I had stood up right into this poor piece of aluminum, bent the living daylights out of it, and in return it fought back, tearing a very loved shirt (obtainable only at the Apple company store at their worldwide headquarters in Cupertino, CA) and putting a couple good gashes into my back.
I’m now seriously contemplating a decision to go completely wireless for the throttles…
June 4, 2012
Holy. Crap.
It’s been how long since I’ve made an entry on this blog or done any meaningful work on the layout?!?
Apart from the prototype being given funding to survive (though a few extra million for bridges is now necessary for freight service), I haven’t done anything in the basement or written anything on this blog for virtually four months… And granted, the work done over tonight and last night isn’t much, it is progress.
So I started out by doing some cleaning. Always a good thing to do, especially when one is trying to figure out what to do next. Leaves one better prepared to actually do the work, rather than get frustrated at the fact you want to do something but can’t because of crap getting in the way. Swept the floor near the chopsaw, took care of a few bits of stuff that didn’t need to be there (like a top panel for a washing machine I no longer own…though it might actually come in handy at some point like a magnet board perhaps…) and organize some of the tools. Didn’t get as far as I should have, but progress nonetheless.
Then over to do some wiring work near the helix and the port sub. Realized I needed some height to work on those spots and set out to find a step stool. Except I didn’t have a milk crate to stand on or anything else that would substitute.
So I decided to do something to a dear piece of woodworking my brother built in shop class back when I was in high school… For those who know me, that’s a good 18+ years ago. It was a small-ish table, still on the tall side, with a small shelf underneath the main top. Nothing too fancy, but wood wrapped the edges of the plywood and solid wood for legs. Varathane on most surfaces.
Yes, I tore it apart.
It was getting rather beat up, and had served it’s purpose well. Most of the time it held my spraybooth, then during the construction of the layout, it’s been a collector of various tools for drywalling.
I took the top off, will repurpose it as a shelf somewhere, and then took the smaller shelf and removed it from the legs and tore the legs all apart. Most of that was easy given the fact it was broken already. Sawed 12″ pieces out of the legs (ruining the clean floor I just had) and then glued/screwed them to the four corners of the smaller shelf and voila. A step stool that’s both light and tall enough to allow me to whack my head against light fixtures and the ceiling. Not that I plan on doing that…
So while I’m up there drilling feeder wire holes for the track leading up to Arrowsmith siding, I’m still wracking my brain as to how I can efficiently get power to the ready rods and light up all the feeders I’ve lovingly wired to the track. And then I start to experiment.
The feeders hooked up already to the ready rods are with big ring terminals. A couple snips and they insert between the internal tooth lock washers really easy. Problem with using them is that it still requires a T joint and tiny wire – 18ga at best to make the connection to the bus which I’m using 12ga solid wire for. And then it dawns on me that I could make a few modifications to them and save myself a bit of work and a lot of extra connections. Here’s how:
- take one crimp, and hold it by the ring very firmly in a pair of pliers.
- using a sharp xacto knife, slice the plastic off the crimp.
- using small needle nosed pliers, open up the little hoop so it becomes a flat piece of metal. Use pliers and/or a hammer and the concrete floor to make the entire piece very flat.
- using pliers, bend the tab up and back towards the ring in a hook that will hold the wire passing by perpendicular to the ring.
- strip and solder the terminal to the wire and attach to the ready rod the same way I attach the others.
I’ll post pictures when I have a complete setup, but that I think will solve a lot of issues and make for a neat way to do up the wiring to the ready rod, likely on Wednesday or Thursday evening.
Nice to be back into this thing…
Recent Comments