It will be fixed
In some respects, building something gives you knowledge of how something goes together.
It also (hopefully) gives you knowledge of how to repair it.
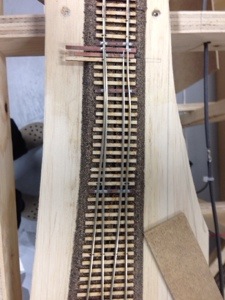
Due to the cold outside, the non-functioning humidifier on the furnace and the fact the basement is warmer now than in the summer led to another rather nasty kink in a really unfortunate spot: Parksville Junction.
This shot, taken from above, illustrates what happens when things aren’t allowed to breathe.
The last time this happened, at the ballast spur turnout on the lower deck, I cut the rails and they managed to straighten themselves out.
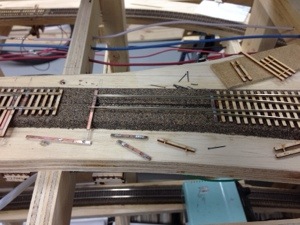
Sadly, this didn’t happen here. After cutting some gaps, the rails did not return to where they should. As a result, some selective repair will now have to take place.
Here’s the progress on the demolition:
Wish me luck!
Modelling…
So the past few weeks have been primarily occupied with getting web pages done up for SUPERTRAIN – not so much for the public, but for the people who will bring their displays and wares to the show.
But that’s not to say I haven’t been doing nothing for the layout. Thanks to Dave Bedard for inviting Cam and I down to his place over a few evenings over the past few occasional weekends to do some modelling. He’s worked on some of his locomotives, a couple of mine (those GP38AC’s you saw in Jason Shron’s pictures? Now painted and decoderized, just getting the final details added like handrails, grab irons, lift rings, etc. I’ll fill you in on those, with pictures, once they’re complete.
Actually, that was more Dave and Cam’s work. I’ve been working on a rather unique car that was rather essential for the layout:
The CP skeleton log flats.
These cars are really spindly things, purpose built for carrying logs and poles. I’ll be loading them with the latter, and there in lies the challenge for modelling such a car: there’s nowhere to put weight when the car runs empty. Kaslo made a resin model but resin isn’t a heavy material, and there’s just a tiny cavity in the centre sill to put weight. To operate my layout, properly, I need to be able to deliver empty cars to the two industries in Courtenay, and the resin cars are simply not able to be made heavy enough to operate properly. Solutions were investigated, including photo-etch brass (filled with liquid gravity), shapeways metal, and borrowing the centre sill from an Atlas Trainman bulkhead flat car.
Until Cam found, quite by accident on Walthers, a kit of the very car I need, made entirely from solid cast pewter (aka, metal), from Custom Finishing. In stock for around $27, an order for four cars was quickly placed and picked up when they arrived at Hobbytech.
The kits were produced back in the late 90’s and thankfully didn’t sell out (either that or the molds still function) so I could get them some 15 years later.
They are as old school as you can imagine. Though the direction sheet indicates these are an easy build, nothing could be farther from the truth. The amount of filing and fiddling with these kits is the most I have ever seen…I would charitably say that between Cam and I, we’ve filed about a half-ounce of pewter from the parts that make up a single car.
But the results I think will be more than worth the effort. Especially when I think of how much time I would’ve spent trying to learn and design the car from photos and crude folio drawings, without any assurance of the resulting parts coming out to my satisfaction.
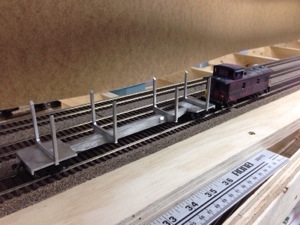
You tell me: doesn’t this partially finished car look pretty good?
The car is sitting on ExactRail 70 ton trucks (complete with semi-scale 33″ wheels) with Kadee 78 couplers. The kit needs a thorough washing, shimming the two centre bunks and gluing to the sill, but otherwise ready for paint and decals. Two other cars are in process, coming close to the same state, and the fourth hasn’t come out of the bag yet. I’m likely going to leave it like that to get a rough idea what the starting and finishing weights are.
I suppose the caboose deserves mention too. It’s an older Athearn end-cupola steel caboose, factory dipp…err, painted in CP script for international service. That scheme is way old for my layout, so out came the windows, off came the roof walk and cupola. After a good long soak in 99% iso, plus plenty of scrubbing, the car is as you see it now. Cam also plugged the old roof walk holes, and it’ll be seeing a few coats of True Line Trains Action Yellow and decalled for CP Rail. So after that is finished and I have another one arriving from Florida via eBay, I’ll have, I think, enough cabeese to operate the layout. But all of them will be stand-ins.
And that is a bit of a shame. The cupola is wrong, the roof is supposed to be a peaked raised panel roof instead of a curved roof, and the windows are not right. Yes, they’re steel, have the cupola at the end and painted in the right colours. And for now, that will do. There just isn’t a kit (yet) available for the proper caboose, and I’m not going to scratchbuild five of them either. I did have an opportunity to get a proper brass caboose, painted in the right paint scheme, for $300-ish but the wife vetoed that purchase. And in some respect, I’m glad she did. Because what the island had was a consistent fleet of cabeese, and having one correct and several stand-ins would’ve made the correct one stick out like a sore thumb. So until I’m able to do a wholesale replacement, the stand-ins will have to do.
Sorry for the novel on such a tiny aspect of the building, but it’s something to read…
Cheers!


Recent Comments