
August 12, 2012
Been a while since I’ve identified a post under “basement development”, but the work Cam and I did this weekend was certainly that work.
Saturday, we made a quick trip to Home Depot, picked up a sheet of 3/4″ MDF and four strips of pre-primed moulding. The sheet of MDF was ripped there to 10 1/2″ and 10 3/4″ wide, per the quick measurements I made earlier in the week.
Sunday morning, I went downstairs and got to work putting a coat of primer on the sides and one of the faces, as well as finishing up the trimming of the drywall to the proper size.
Later that afternoon, Cam came over to assist with getting the shebang installed. After finishing the priming od the bloards, we needed to make a trip to Rona for some ‘tuck tape’ which I needed (but didn’t realize when we picked up the other stuff), we got to work on cutting and installing the casing.
And here’s where I found that the window wasn’t installed very squarely in the opening. A few custom cuts later, we had everything secured, and got the first piece of moulding nailed in. And then pulled it out owing to the fact the brads I was using were too short. Redone with 2″ long brads, all was made secure.
Still to be done is filling of the screw holes, nail holes, siliconing the seams and corners and for this window, applying some small moulding to hide the distance between the casing and the window.
Cheers!
August 7-8, 2012
Since the weather is rather warm in Calgary, decided to head downstairs to the basement and cool off, admire the work done thus far, dream a little bit, and just generally cool down.
While I was sitting there at the location soon to be occupied by the team track of Courtenay and Vancouver Island Gas, I looked at the standards holding up those far-from-level brackets and realized a rather important fact:
The standards are not necessarily plumb.
There are some curves in the standards, either from a rather zealous drive from the drill securing the screws, the taping and mudding on the wall not leaving a rather flat wall, or likely, a combination of both. So with the curve in the standard, the shelving brackets, especially the long 19″ ones, are pointing up. Thankfully I discovered this before much work was done and the fix for this is reasonably easy to implement. We’ll pull the brackets, pull the screws and shim the standards so they are straight and secure. That should fix the levelness of the brackets.
I also realized that if I’m going to get the windows finished, I should do so fairly soon, lest the work become a hell of a lot more difficult owing to the fact that the layout in front of the window at Port Alberni will be very deep… Cam agreed on this fact and told me to get the drywall prepped (ie: flush to the window frame) and on Saturday afternoon, we’ll acquire the casing and boards and get the windows finished. So, over that evenings and Wednesday, I’ve been getting reacquainted with the drywall saw, utility knife, rasp and most importantly, vacuum cleaner and getting that task taken care of on both windows. I’ll probably need to replace the vapour barrier on both of them owing to the fact that it doesn’t take well to long-term exposure to UV and my punctures with the saw.
Cheers!
August 6, 2012
What a day of progress!
Cam came over in the morning and we got to work on getting benchwork built for the lower deck. But before we did that, I wanted to get that chopsaw stand that Murray brought over on the 21st into action. Turns out that shelf I was going to use (the top off the table my brother made eons ago) was the perfect size for the base of the chopsaw, and shortly after, the chopsaw was secured using bits of ready-rod, spare nuts and washers from the now-complete helix construction, and we can finally use it as intended. I even have the ability to do much of the work solo now that I don’t have to have someone hold up a long piece of wood.
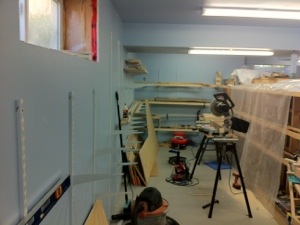
Once done, we got to work on the lower deck benchwork, as well as the middle deck too, in some respects given that the deck depths were going to be the same. Stop blocks were installed on the saw and we chopped up a lot of the 2″ wide strips into dozens of fingers.
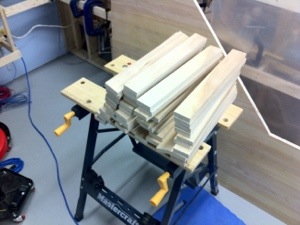
Holes were drilled through all of them for bus and accessory wires and voila. Half the job done…well, not quite. Lots of other things needed doing, like drilling holes through the shelf brackets for securing the wood to the metal brackets, cutting the pieces to good lengths, splicing them together, and then getting the works secured to the shelf brackets and to the wall at the south end.
That chewed up a very good portion of the day and then we started mocking up how the rest of the decks would play out, and it turns out, quite well…Well, almost. I was hoping we could simply screw from underneath the brackets into the 3/4″ plywood for the upper deck, but initial appearances showed that many of the brackets were pretty far from level, and no idea why. We’ll investigate later as to potential solutions.
Cheers!
August 5, 2012
I knew Cam would be busy with family today, but had a project that I knew wouldn’t be too hard to complete solo, and that was the installation of electrical power for the chop saw into the peninsula wall and also in the inside of the dispatchers booth, primarily for a computer or lights, or even a charger for radios.
Using some 14/3 household wiring, plus the bits I picked up yesterday, went about drilling holes through the 2×4’s and then stringing wire. A couple boxes secured to the wall, outlets secured to wires, and faceplates attached, I set to the last task and that was terminating my “semi-permanent extension cord” with a male plug which then plugs into the actual electrical circuit near the end of the wall. With everything plugged in, and I went to test it. Couldn’t find my circuit tester, but figured my voltmeter would verify power just as well, and found it read 148 volts.
Oh crap. That’s way high.
Tested a few other spots and found them high too.
Called Cam later that evening and he reassured me that the household wiring was fine, that things would’ve went poof a long time ago if that voltage reading was correct and that he would be happy to test the house with his multimeter. Sure enough…my multimeter is now usable primarily for continuity and that’s about it. Guess who’s buying a new one? I’m not that terribly concerned, it’s given me many many years of life, though now I’m beginning to doubt just how accurate the measurements I’ve made have been as of late…Perhaps my accessory bus isn’t actually around 17V, but more around a normal 12? We’ll see when I pick up a new one.
Cheers!
August 4, 2012
Murray and Cam came over early in the morning to put some time in on the layout and we managed to accomplish the installation of a fair number of the shelf standards (thanks to Murray for bringing his 6′ long level), and now we have standards on two complete walls with a plan on how to start into the nose of the basement.
We also discussed aspects of copying this system over to Murray’s new layout, and discovered I needed a few things. One was an additional 4′ long standard to help close the a rather sizable gap (give or take 30-35″), Another was a full sheet of 3/4″ plywood which would become the prime bit of benchwork for portions of Port Alberni, and lastly, I wanted to put 110V AC power into the peninsula wall, and needed some bits for that to happen. Murray has a pickup truck, Cam and I do not, so we figured it would be worthwhile to take advantage of the transportation opportunity.
After returning to the house, we met up with a friend of mine, Matt Buchanan, came over while he was in Calgary to take a look at progress on the layout. He’s planning on a little switching layout with a portion of Vancouver’s downtown. While the four of us were there, we got that 4×8′ sheet cut into two pieces, one representing the eastern end of Port Alberni and the other the area around the ICG spur and the Port Alberni enginehouse. After that was done and Matt had left, we decided a hobbyshop crawl was in order. Michaelea and I left for Lee Valley to pick up the stuff there that we didn’t pick up in the morning, Murray and Cam left for an errand Murray had to take care of and we met at Trains and Such and then went around the south end of the city to a few shops and ended up at Kelsey’s for dinner.
The rest of the evening was spent playing down at Murray’s layout. More would come on Monday!
Cheers!
July 31, 2012
Spent the evening tonight doing a lot of cleaning up in the basement. Things were getting out of hand, messes were everywhere and for some reason, that one sweepstick (30″ radius) was still missing.
So, I used some of those shelf brackets, put them up fairly high up on the standards and put the 2″ strips of wood up there, additional standards yet to be installed and some of the additional strips of wood. The larger pieces all got consolidated as well out of the way and the floor thoroughly swept.
One could say I made a clean sweep, as I did locate the sweepstick on the floor.
Oh yeah, the other major change was the moving of the chop saw. For quite some time, it resided up against the wall that was soon to have benchwork installed on it. It’s now in front of Bryn, with a sheet of plastic stretched across the three decks behind the chop saw to protect it from flying debris and a whole ton of sawdust.
All this done to facilitate more work this upcoming long weekend!
Cheers!
Recent Comments