Turnouts complete, trackwork not far behind!
It’s extremely gratifying to finally report a completion of a few things, since a lot of progress has taken place with the layout since I’ve written last:
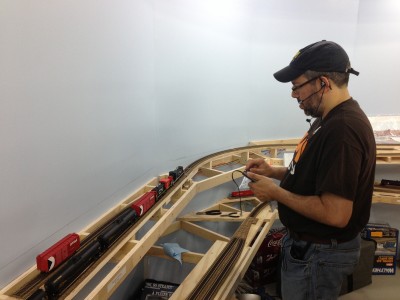
Firstly, I’m done with turnout building and placement! This weekend I finished spiking down the switch just outside the Port Alberni enginehouse. This was the last turnout to be laid.
I still need to hook up a lot of servos, connect them to the Tam Valley Depot Octopus III controllers and figure out how they will be thrown. Dave Bedard favours toggle switches, I like momentary push buttons. It would be awesome if I could get Signalogic Systems SCP controls to work; I have them running the few tortoise-powered turnouts on the layout, and to have just one interface would be great. It’s bad enough to have bullfrog knobs and another means, to introduce a third might make things confusing for the operators.
On other “almost completed” items, I’m less than five pieces of track being spiked down from the milestone of being done laying all trackage. Two bits of track into the enginehouse (will it be a structure or just the foundation? I’m trying to determine -without a lot of success- whether the current enginehouse was built prior to 1988 or not. If you have any info on this, please drop me a line!), the Vancouver Island Gas spur needs its trestle constructed and then two lengths of flex track near the Port Alberni depot need to be spiked down.
Wiring has been done for the majority of the yard in Port; the southern quarter of the yard plus the remaining trackage towards the plywood division still needs feeder wires hooked up. Some bus wires will also need to be strung too.
Will have to update this post with pictures later, along with updates on a few other bits – the GP9 fleet, the freight car fleet and more. Stay tuned!
Additions to the GP9 Fleet
As I eluded to in my last post, I’ve been working on a few GP9’s for the layout. I have two functioning units on the layout now, but that’s nowhere near enough for what was on the island in 1988 and earlier timeframes. (slight aside here: Cam keeps wanting to wind the wayback machine to 1986 to model a whole ton of log trains when truckers went on strike…and unfortunately, all the locos on the island then were GP9’s…Not hard to figure why I want to model 1988 – a lot more variety in motive power that year!)
Back when Proto was affiliated with Hobbycraft Canada, the GP9 models produced in CP Action Red were done with only a single number (maybe two, but I can’t say I saw it), and trying to find this paint job on ebay was getting quite frustrating. Too expensive or simply not available. So I started looking and found a few relatively cheap GP9’s in Santa Fe and CN paint schemes which were mechanically similar to the units I had – specifically, equipped with Dynamic Brakes. I was also informed that stripping the paint off these units would be pretty safe and easy – simply dunk them for a period of time in 99% Isopropyl Alcohol.
One paint scheme was easy. Others…Not so much. Put it this way, if I’m going to go for more units, I’m looking for Santa Fe black and silver units. The CN noodle required grit blasting with baking soda to remove, and the blue and yellow Santa Fe paint scheme spent days in the alcohol and numerous brushings to remove the paint whereas the black scheme was completely cleaned off after a mere 8 hours in the dip and a gentle brushing with an old toothbrush! Two other units were stripped as well, but cannot recall what paint schemes they were in. Something tells me one of them was a CP Tuscan scheme. This has been a longstanding project… I also acquired one undecorated GP9 as well, but it presented a unique issue in that it came without dynamic brakes. Oops. Cam found an appropriate part from Bachmann of all places. It’ll do!
Once the units were all completely stripped, and with advice from Cam, we started in on making them more appropriate for CP Rail. First off was acquiring a bunch of detail parts – a proper CP horn, high hood bell, sinclair antennas, sand hatches, handbrake wheels and 48″ fans. These models were originally delivered with 36″ fans for primary cooling, but most of the prototypes with 36″ fans were sent for rebuild prior to 1988. So four of the units on the layout will be equipped with 48″ fans, which required a fairly substantial patch job. One that Cam readily agreed to do… Thanks! Over the course of several evenings at Dave’s place, these parts were installed onto the stripped shells, fans installed and generally, the shells made ready for paint.
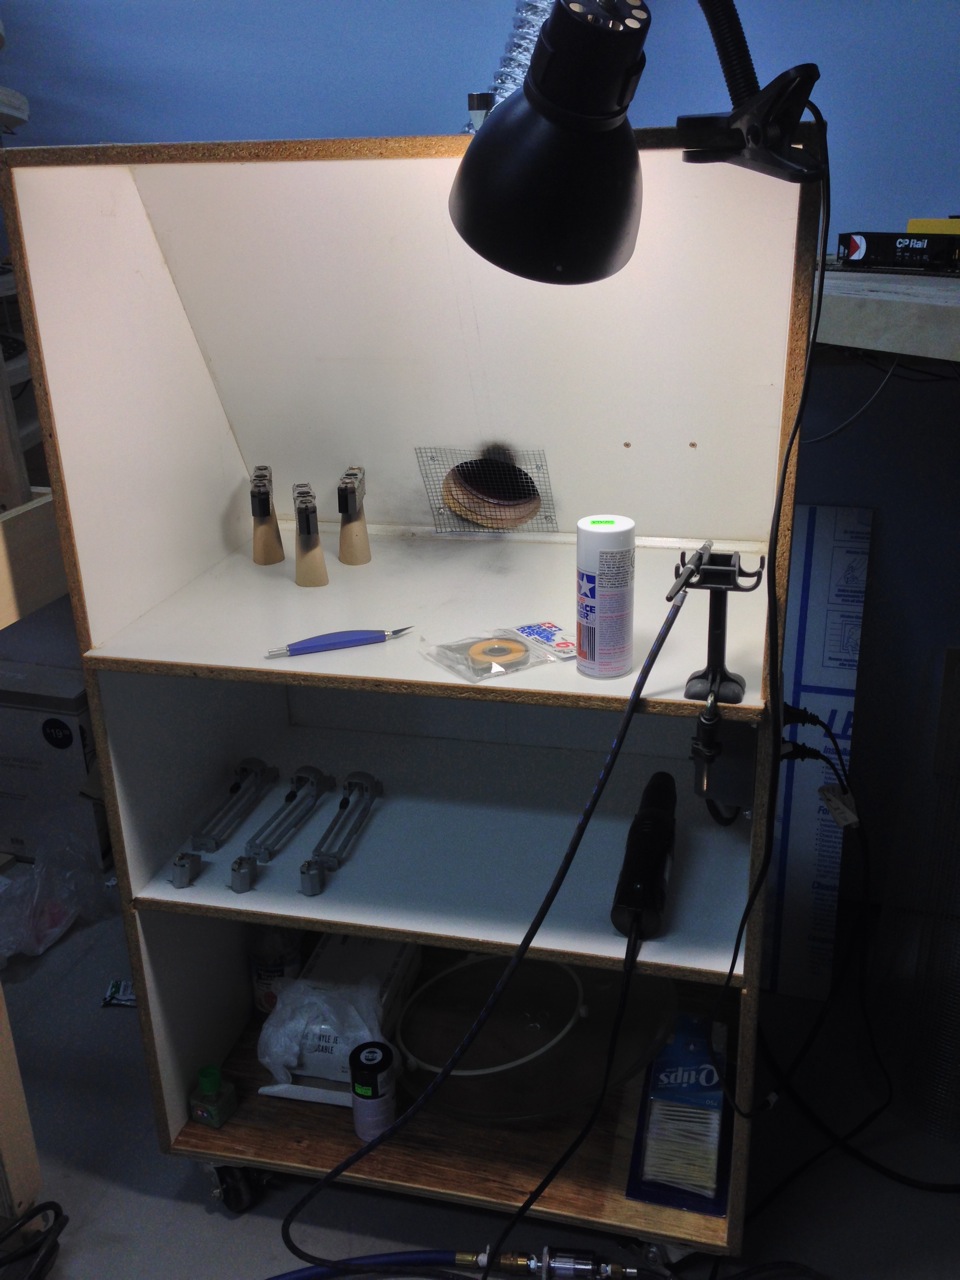
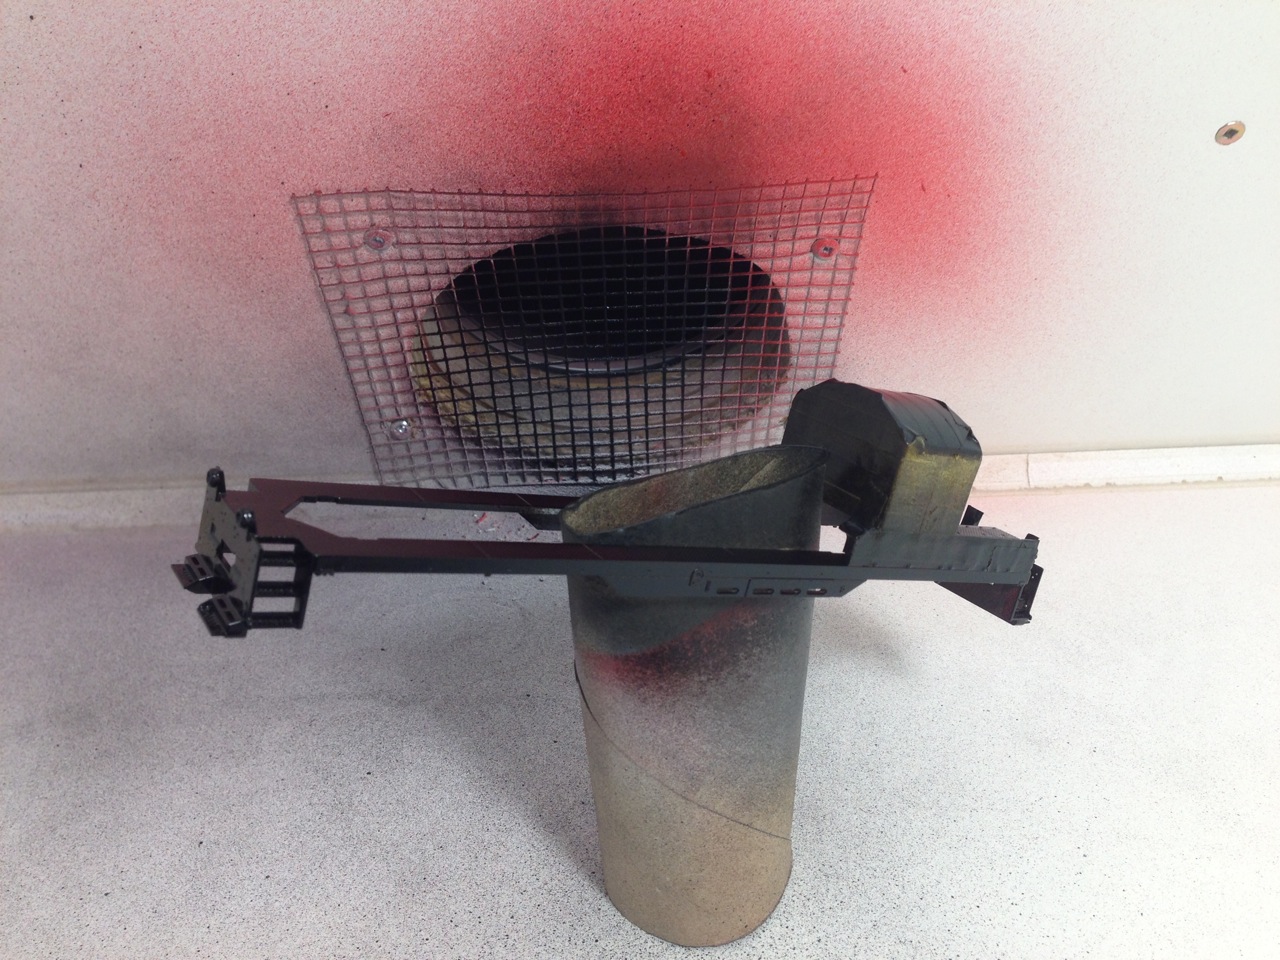
Concurrently to all this was the preparation of my new spraybooth built by Garth Prestegaard (apologies Garth if I’ve spelled your last name incorrectly) many many moons ago. Off the old spraybooth was the fan and electrics, and onto the new cabinet was the same fan and new wiring. Once plugged in, flick a switch and the fan turns on and turns on anything plugged into the electrical outlet beside it – used for lighting and a hair dryer. Works well!
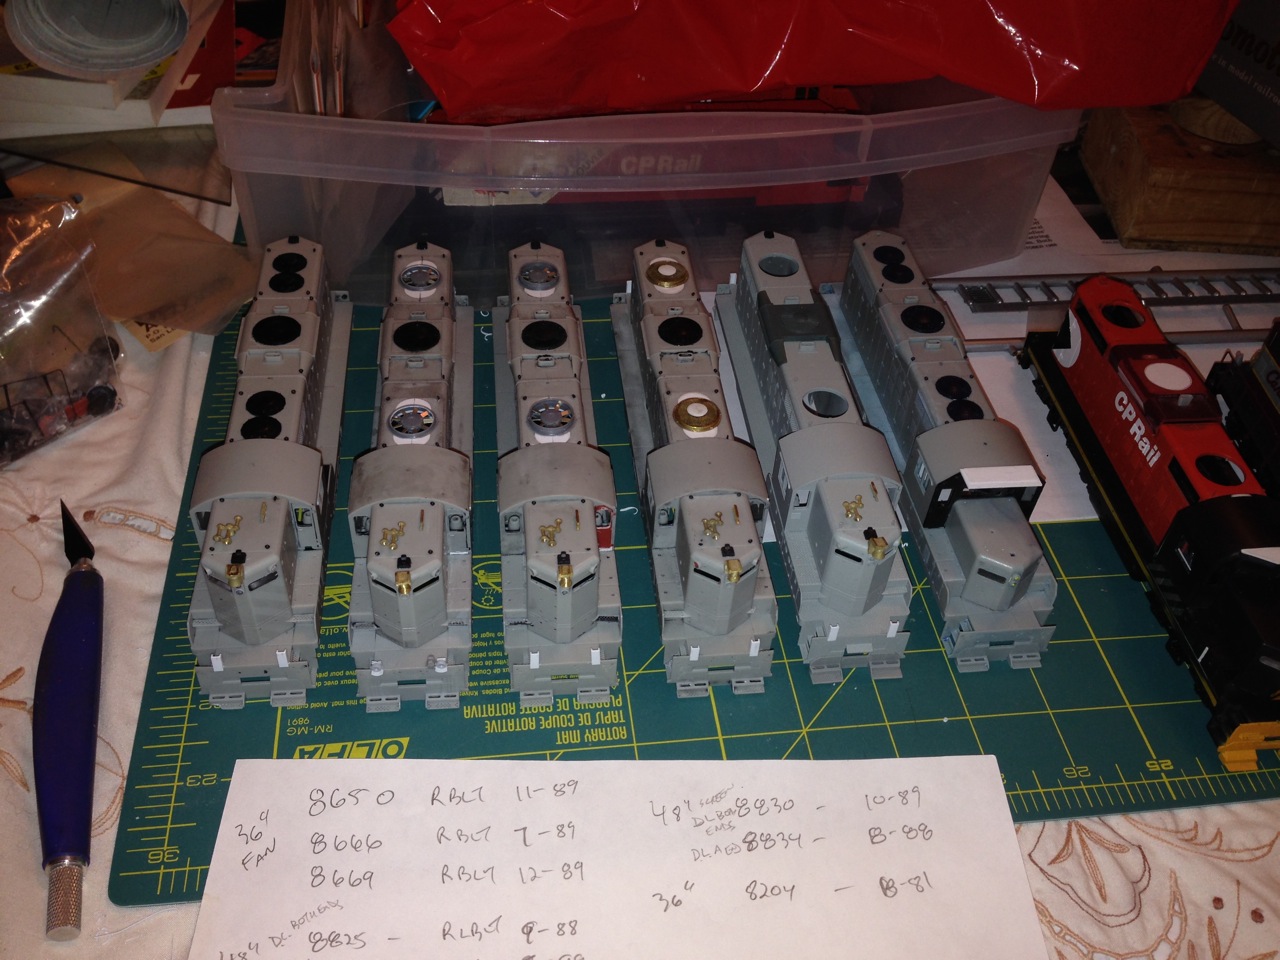
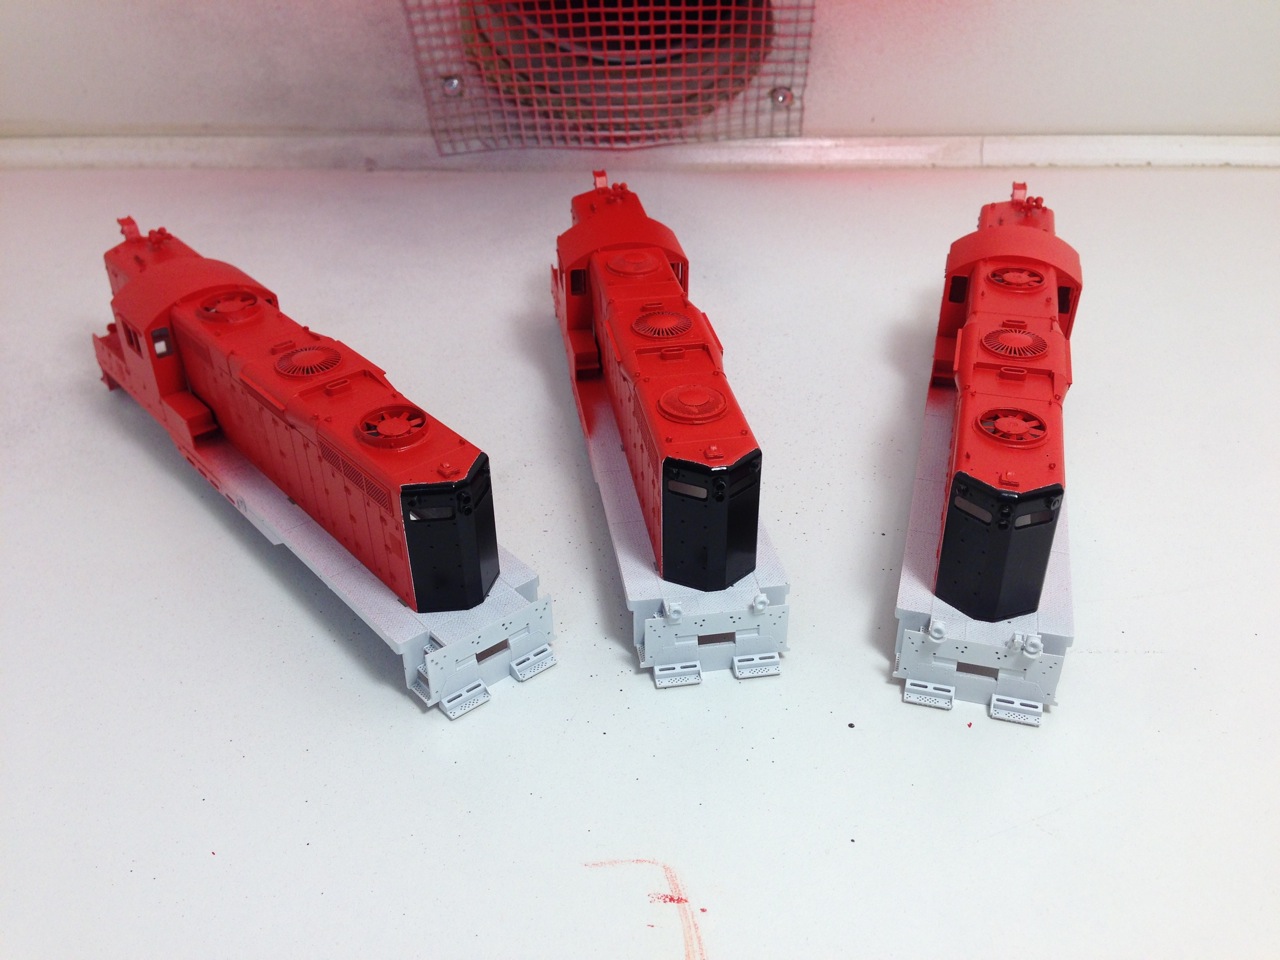
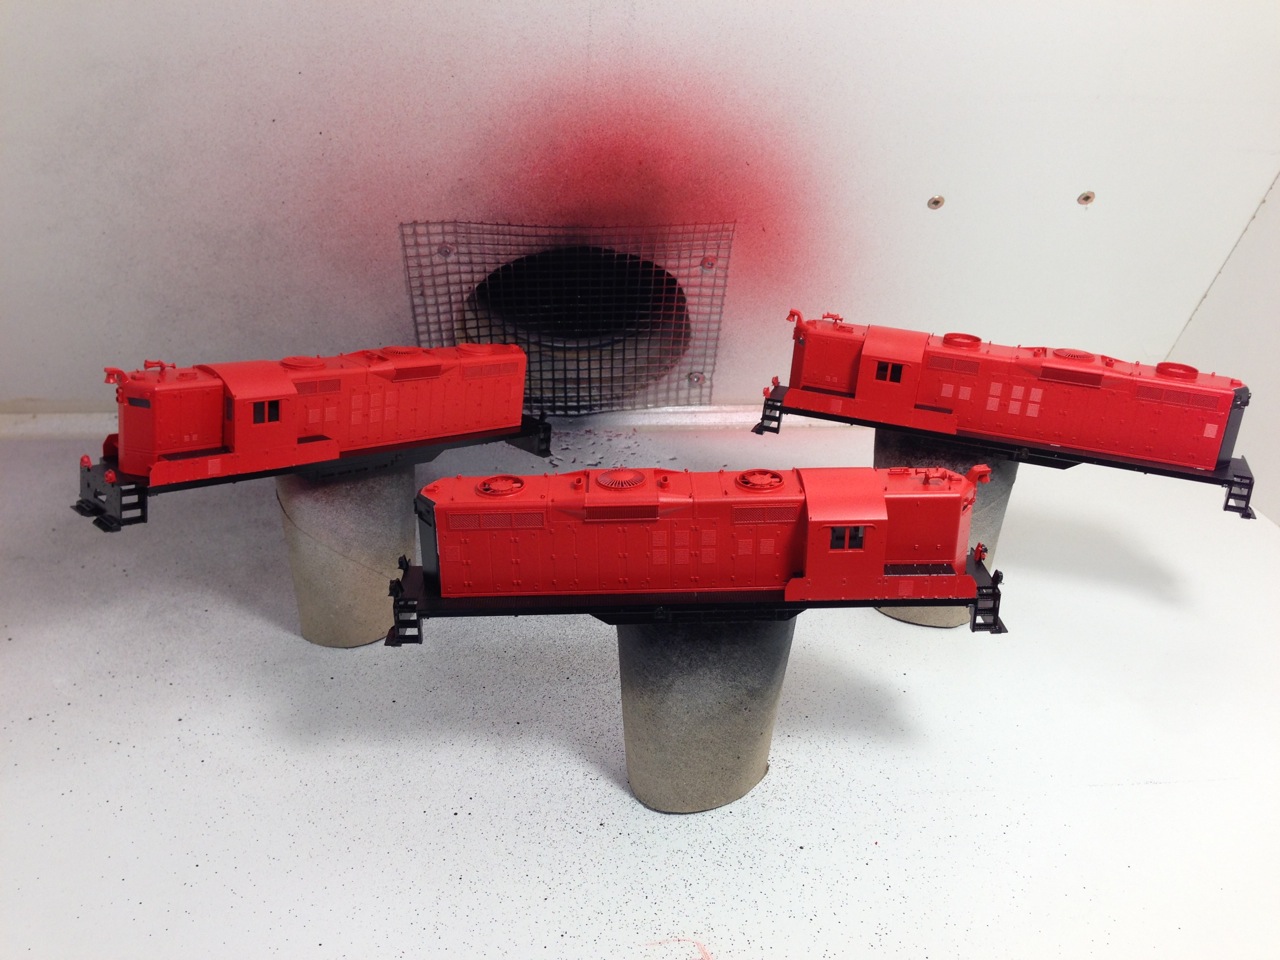
Six shells, three ready for paint, three needing some work
Which generally brings me up to today. I have six units soon to be ready – three units with 48″ fans all complete and ready for painting. One unit with 36″ fans required installation of the winterization hatch which I forgot to strip first, a second unit with 48″ fans required fans that I didn’t already have, and the third not-quite-ready unit which will be 8204 isn’t done owing to the fact it’s undergoing a more extensive amount of work – a short-hood upgrade. That one is the one on the far right in the above picture.
On advice from Dave, I washed the three units, air dried, and then painted the rear end with Tamiya Gloss Black out of a spray can. Very good stuff!
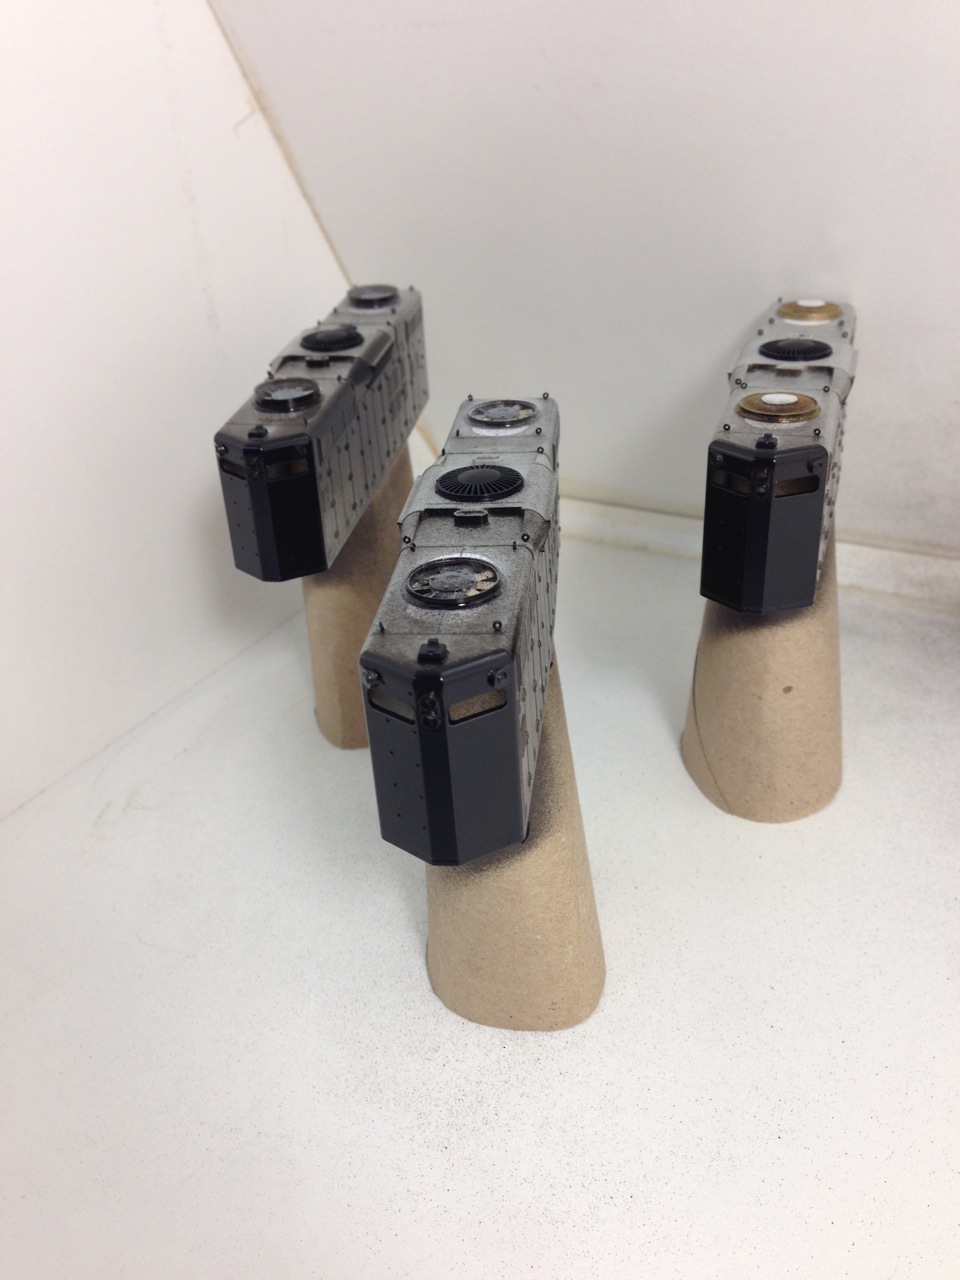
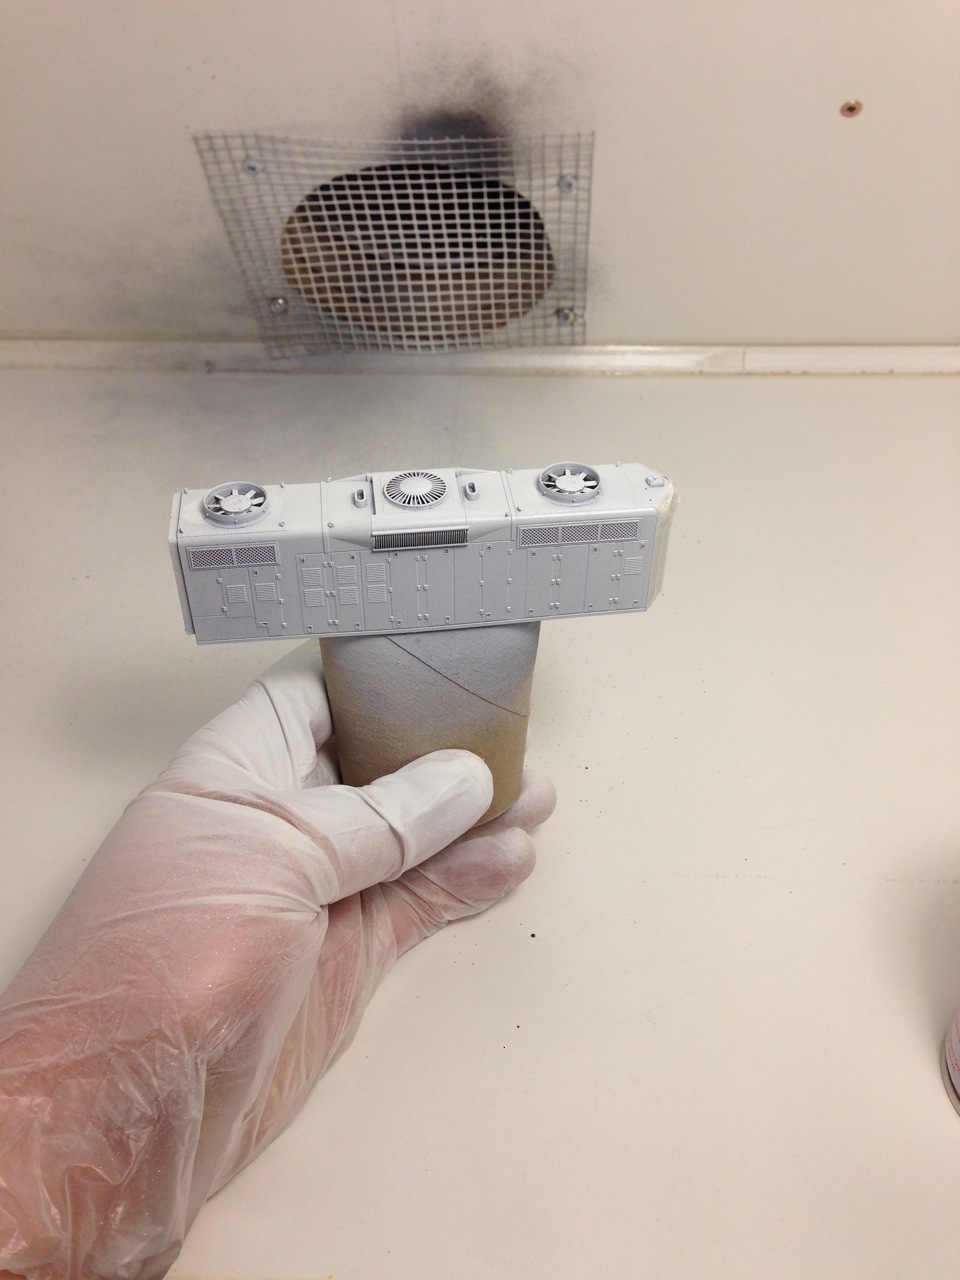
Toilet Paper Tubes make for good handles and stands for painting
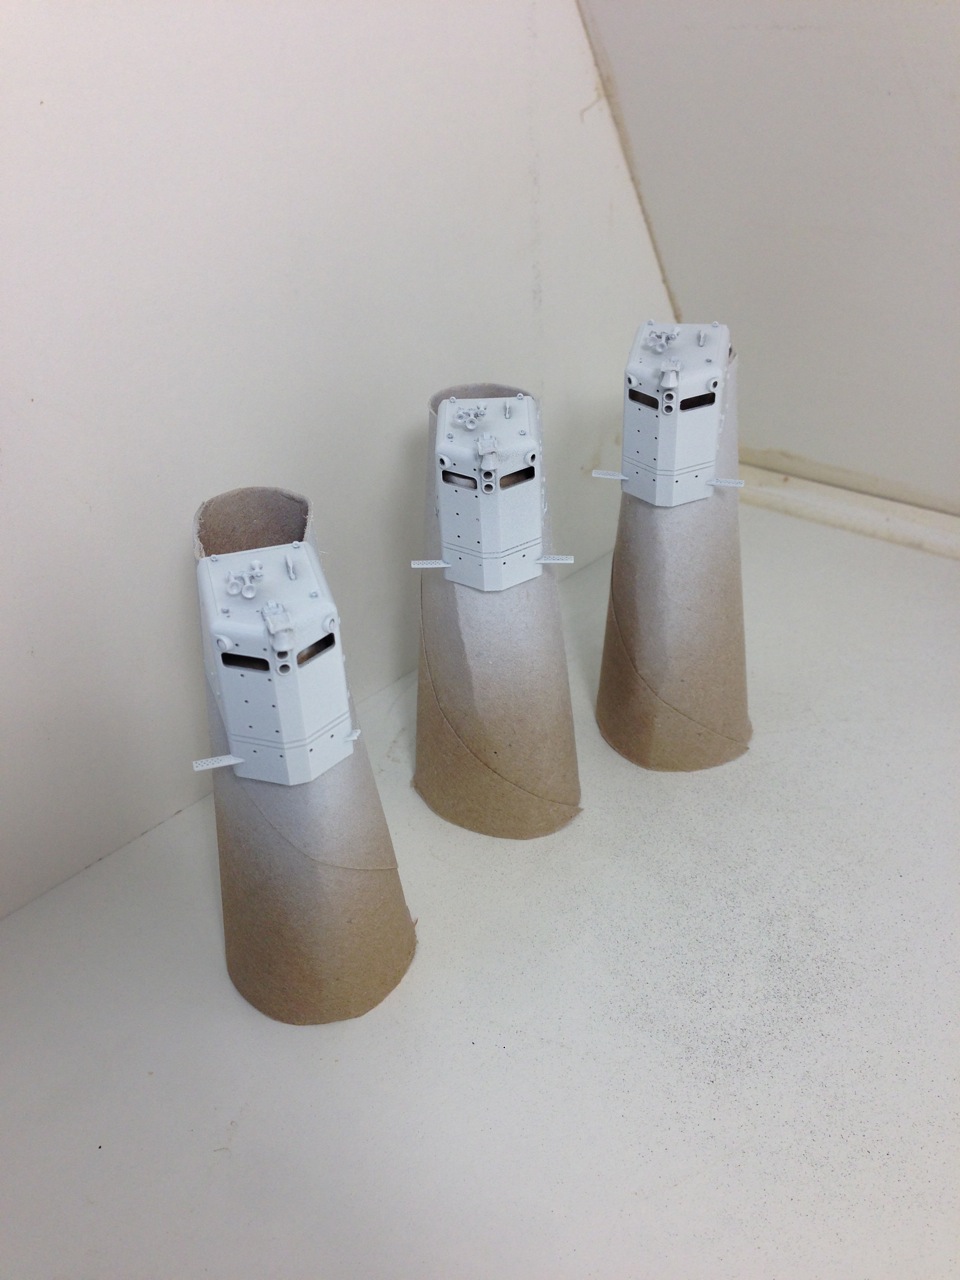
Toilet Paper Tubes make for good handles and stands for painting
Next up was priming the short hoods and the Cab/Frame assemblies. This was done with Tamiya Fine Surface Primer White. After numerous light passes, that was complete. Attention turned to masking off the black paint so I could prime the long hoods. What an eye opener that process is! Obviously one wants to ensure the masking is done cleanly and properly to avoid any paint from bleeding underneath, and this takes time. Spent nearly three times longer masking it than I did painting them…
Once masked, the white went onto the long hoods. Lunch called at that point and afterwards, got the airbrush hooked up and mixed up a couple drops of Vallejo Retarder Medium into the paint cup 2/3rds full of True Line Trains Action Red paint. Sadly, this paint has been discontinued owing to Testors (manufacturers of the True Line Trains paints) getting out of a lot of paint lines, so I’m quite glad that this paint goes on so nicely. After painting 3000 and 3004, plus the three units today, I’ve used up maybe 2/3’rds of a single bottle. I have two more full bottles and think that I’m pretty set in case I want to redo other units…
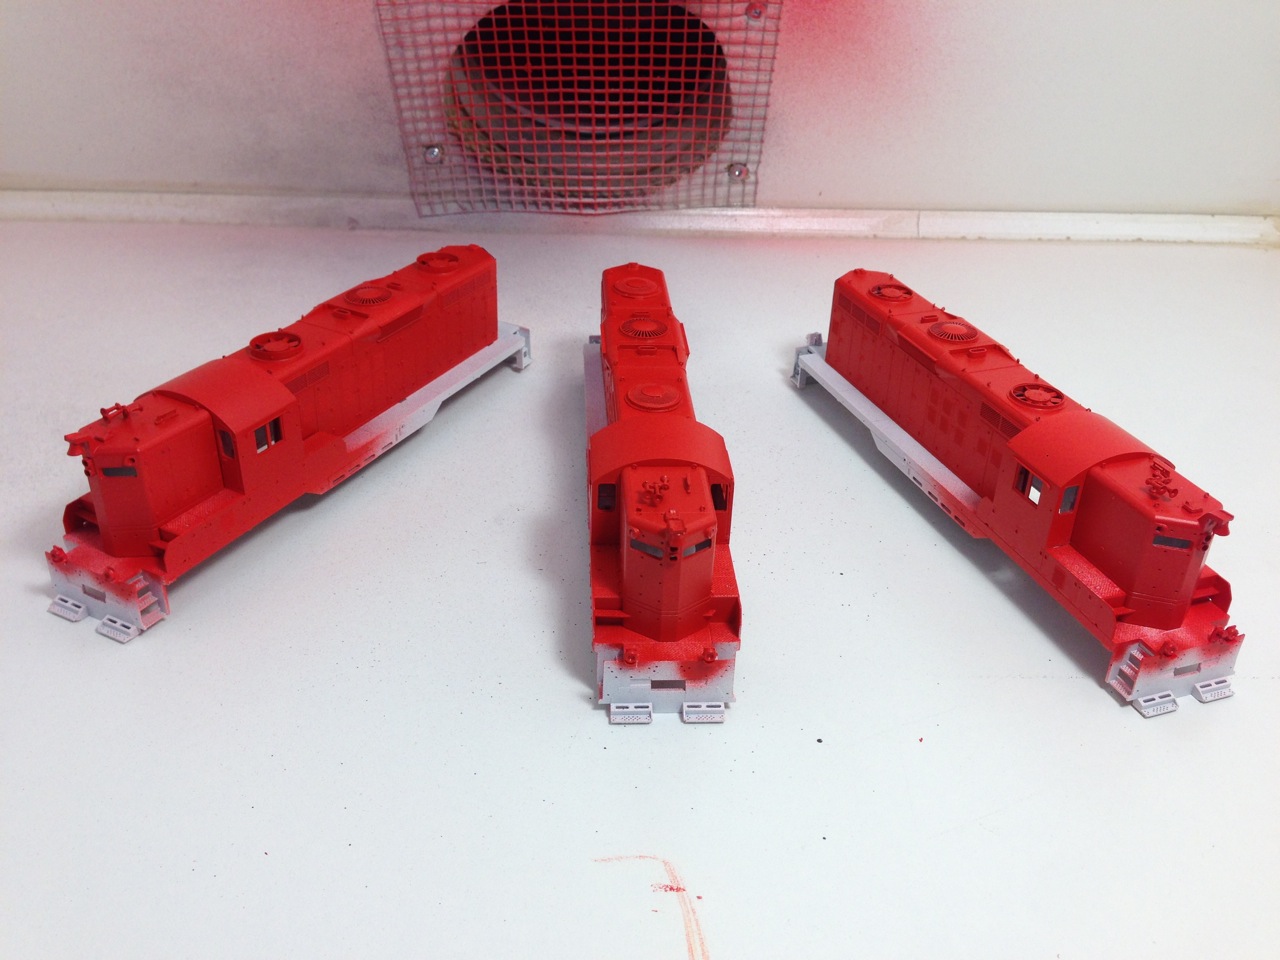
Following that process, and letting the red cure quite well, on went the masking tape on the cab/frame assemblies to protect the red which was sticking around. Sprayed the black onto the rest of it, pulled the tape off and after scraping off the (thankfully very few) spots of black which managed to make its way under the tape, have some very sharp looking units.
Onward to glosscote (very light coats according to Dave), then application of decals, and the installation of decoders onto the chassis…Which reminds me. I should get to it!
Milestone #(mumble)
With Athearn’s release of the 33,000 gallon tank cars suitable for LPG and Anhydrous Ammonia in the Genesis line, I picked up three of them labelled for Procor.
Shortly after getting home with them, Cam and I took inventory of them for coupler replacements. One thing shocked us both:
I have enough propane cars to fill every facility on the layout, their replacements and a few more to cycle on and off the island.
I’m done buying propane cars!
So with the exception of the skeleton log cars, I’m coming very close to having enough rolling stock to fully operate the layout. I just need to acquire enough metal wheels (hey, buddy, can you spare me some 33″ semi-scale Intermountain wheels?) and couplers to operate them with.
Amazing, eh?
Inaugural Ops Session!
A long overdue post, primarily because I’ve been waiting for a specific photo… Figured I’d go without it and post it when I get it.
So Jason Shron of Rapido Trains (a model train manufacturer who makes a lot of passenger equipment, save for the one I need on my model railway…yet) arrived in Calgary on the 30th of July and after his first gig at Chinook & Hobby West (North), we went for dinner with Sylvain Duclos at the Five Rivers. A vegetarian restaurant serving Indian fare. Interesting… About all I can say to that as I’m not one typically for curried anything. But the more important stuff for me was when we got home…
That evening was spent showing off the half-covered layout to both Syl and a really tired Jason. James Powell came by on the late side and had a good look around, but despite his offer to help with the cleaning, figured enough rest for his trip back to Vancouver Island was a better idea. All were really impressed, but I wish I had things a little further along to show them the layout without all the sawdust.
Wednesday was spent showing off the GMD-1’s at Eastridge and CMT. Glad to see a few more friends who have been asking when my layout is going to be on the tours for the CMRS. Likely next year folks… Also did a little bit of cleaning downstairs and finished off the wiring…
Close-up of Cam’s work-in-progress on a pair of Atlas GP38AC’s
Photo by Jason Shron
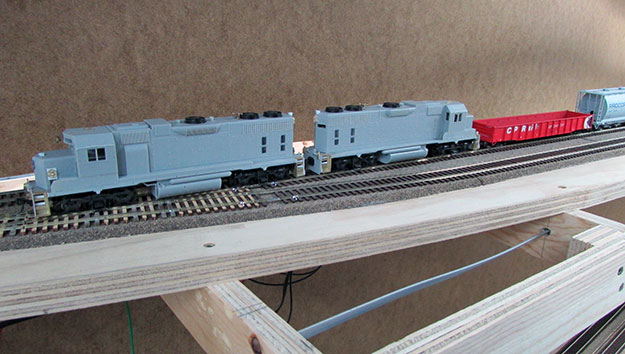
Thursday saw Cam arriving early-ish and we seriously attacked the layout and got it all cleaned up, track polished and all ready to go for Friday. Got most of the Quad-LN’s programmed for basic addresses (the rest will come later) and a few more cars were prepared and the pair of Atlas GP38AC’s were unveiled. Sans paint and handrails but looking really good. 3000 and 3004 will be very special units when they’re complete – thanks Cam!
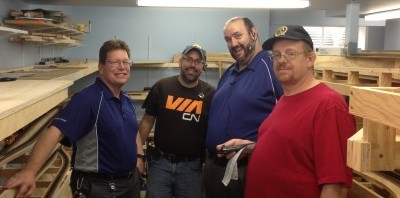
The first ops session crew – from Left to Right: Murray, Jason, Dave, and Cam
And then Friday morning arrived. First ops session and a few great friends made it for the big day. (Thanks Murray, Dave, Cam and Jason!)
Jason expertly pilots CN GMD-1’s 1011 and 1021 past the Fletcher’s Furniture spur.
On account of a lack of working motive power on the island, the superintendent of the E&N made some phone calls to CN and acquired the use of GMD-1’s 1011 and 1012. These locos were dispatched to service the Nanaimo Switch Job. I…err, make that the E&N Superintendent didn’t send them anywhere else on account of the larger trucks.
Joking aside, things went quite well considering the first ops session is supposed to discover all the bad things and after all was said and done (and Jason on his way back to Edmonton), there weren’t that many things discussed which were horribly wrong. Most issues could be chalked up to not having enough time prior to set things up. Yes, there’s still more programming of the Quad-LN’s to do, operations stuff to setup in JMRI (to generate the switch lists), and rolling stock to prepare. This will no doubt lead to a lot of re-numbering and patching of rolling stock, in addition to more wheelsets and couplers to change out. Memo to rolling stock manufacturers: please no glued on coupler box lids, okay?
All in all, Cam and I are really stoked on how well things went.
We’re still nowhere close to being finished though… But that’s enough for now!
July 27-28, 2013
“All that’s left to do is everything” -Jesse James
Probably the best quote I’ve got from The show ‘Monster Garage’ which aptly describes what we have done, and what’s still needing to be done after he cram sessions over the past couple weeks.
To summarize what has been completed:
Trackage in the staging yard is now complete, spiked down (required a trip to the hobby shop solely for track pins! And then another for more #71 drill bits, both account hard, and unforgiving, birch plywood) and (mostly) fed. I say mostly because there’s probably a dozen feeders still needing to be hooked up to the track bus and about as many needing to feed the microswitches powering the frogs in the staging yard. That aught to be fun…
We have servos installed and running on most turnouts, in fact, all the turnouts which must be electrically controlled, are, though I still have a ton of programming of the Quad-LN’s to do, routes to line, etc. I also changed out the accessory bus power supply with a 6A 12V power supply for the entire layout instead of having two running on the layout. I’ve also got a UP5 connected in the staging area too. To finish that bit off requires finding a spot for the Zephyr to live, wiring it in for the programming track at the end of the wye, and other linked tasks.
And then there’s the cleaning needed. This requires a massive amount of vaccuuming of everything, plenty of testing and generally making the basement hospitable. Did I mention that Jason arrives in a little over 36 hours?
December (mumble), 2013
As much as I dislike Omnibus type things, I’m afraid I need to use it here…
I’ve been down to the basement quite a bit over the last few weeks and haven’t been doing any updates to the blog so my apologies to James and my other lurker readers for not doing these more frequently.
After getting the track boards cut, they spent a bit of time being left alone but they did get secured not long ago. Shortly afterwards, Cam and I cut a board and attached to the wall right at the bottom of the stairs. This will form the tail track and the northernmost trackage in Courtenay. This will come in handy for the crews working the Courtenay turn as they’ll likely need to do some shuffling of cars to switch on their way back to Nanaimo, as the vast majority of the turnouts are south facing.
I’ve also been busy building turnouts, mostly #6’s, but also a #8 curved turnout as well. Much as Cam would like Courtenay and the trackage into it to be arrow straight like it is in the prototype, my basement just won’t allow it, and I’d rather not give up a couple important industries (BC Pole and Dominion Tar) to accommodate that wish, so the turnout to the Courtenay team track will be situated on curved trackage. As far as we can tell, all industries in Courtenay in 1988 are present and able to be switched. I’m looking forward to operating it!
As we hosted a Christmas Brunch for a few important family members, I wanted to get the basement into some semblance of order and also do massive cleaning to make it presentable, I spent about three evenings getting a lot of cleaning/organizing/purging/etc. done. The results are fantastic. Family loved it, trains ran (though admittedly some dirty track in the helix caused some angst, more on that later) and all was good. I even spent the better part of a couple hours tonight doing the same to my workbench.
Couple days ago, spent a few hours in the morning to finish painting the stairs into the basement. Just plain white primer for now.
As I eluded to earlier, some dirty track has been bothering me. More due to all the dust in the basement, something rather unavoidable with all the construction happening, I decided to take advantage of the Boxing Day sale at PM Hobbycraft and looked at an Atlas track cleaning car. To the best of my knowledge, it’s the only vacuum equipped car, so picked it up and then proceeded to install a DCC decoder into it. I ended up removing all the wiring inside, hardwired the decoder in and after a bit of programming, am now able to control the speed of the fan. Ran it successfully through both helicies in front of a couple GP38’s. the results were promising. After a couple runs, the hopper was showing a few bits and the screen was covered in fine dust. The unit could definitely use a capacitor to assist the vacuum motor, and a couple other tweaks, but I’m satisfied with it. I’d post some pictures, but they’re too dirty. 🙂
Yesterday, spent a couple hours and laid some cork down through BC Pole and Dominion Tar as well as the mainline approaching both. Should have the rest of the cork laid tomorrow and probably some track soon as well.Had a real SOB of a time trying to get the lid unscrewed off the full 1.5L jar of contact cement though. I now own a couple strap wrenches…
Also received my order of track yesterday too. 10 bundles of code 70 flex, totaling 180′ of track, so should be good for a while. The three existing bundles weren’t going to make it to Courtenay. While we were out shopping, also picked up some 14ga stranded wire from MRO in red and black for bus wiring needs. My PSX-3’s finally arrived a week or two ago and I can get them installed.
Can’t think of anything else to mention. Thanks for reading this far!
January 8, 2012
Earlier this morning, decided to go downstairs and do some troubleshooting. Specifically, wireless troubleshooting. Quite a few months ago, came across a deal that I really couldn’t pass up: an older, radio equipped digitrax empire builder starter set, slightly used, complete with a DT400R throttle, DB150 booster, power supply and a UR91 radio reciever. Realistically, I could do without the first three as I already had them, but could definitely make use of them all. The last item was a missing link so to speak for operators who had a DT400R throttle. Without the UR91, their throttles would be missing major functionality.
And our testing of it from prior to the open house seemed to indicate the UR91 was a dud and needing a Florida vacation.
Well, this morning I tried the one throttle we received with the set, and had no luck. Then checked Loconet. All good. Then I tried another throttle and voila. The locos started responding. I relayed the results back to Cam and he brought his throttle (a DT400R) and play…err, tested it as well. No major issues there either. So I’ve got throttles to send on a trip to Digitrax for repairs and the UR91 stays put…well, maybe. I’m still not sold on it’s location for now…
Later this evening, went back downstairs and threaded and spliced in another section of bus wire, under the newly laid trackage between Buckley Bay and Union Bay, planned the feeder locations from Mud Bay through to the end of trackage and called it a night.
Cheers!
Open house – great success!
So the open house on Wednesday was a great success. Cam arrived mid-morning and helped huge with getting things cleaned up and organized along with me, and Michaelea did a fantastic job tidying up the main floor.
Around 1pm, Cam and I started fixing a temporary loconet cabling thing and then Grant and Mike showed up. And then more came and went…we never did get that cable fixed to a point where we could power up the layout until much closer to four or five pm when everyone was gone, at least for a bit of time. Once done, all was powered up and then more came and went…
In total, I think we had at least a dozen people through to see the progress on the layout. Certainly some of you would’ve liked to be here but couldn’t due to distance, work, or simply being on holidays during this time of year. I understand. If you want to take a look, send me an email jon@calon.ca and we can try to set up a mutually good time for you to take a look.
Cheers!
December 12, 2011
With the snow falling pretty much all day yesterday, decided to get some stuff done around the house and then went to the basement to get some stuff done.
Nearly finished getting the bus wires hooked up to boosters, hated the barrier block I was using to transition the 14ga solid wire to 14ga stranded wire, and ripped it out and replaced it with a terminal strip which necessitated crimping on a bunch of fork terminals. In the end, very much worthwhile for reliability. The old barrier block would’ve been prone to wires coming loose and falling out.
Also pulled the bus wires for the accessory bus and wired in the tortoise controllers in the south Parksville industrial area (National Silicates and the team track) and voila. That works now!
It was by this time that Cam had finished a rather grueling weekend of work and he came over to unwind and at this point I powered up all three boosters, making all track runnable. I gave him a throttle, locomotive and sprinkled a few cars around the layout and gave him the switching orders. Was really pleased to see the layout run smoothly and all the switching done!
A reminder for those who haven’t heard, I’m hosting an open house in a couple weeks. For full info, you’ll need to email me (jon@calon.ca) soon.
Cheers!
December 4, 2011
A quick update tonight before I retire for the evening.
I’ve been taking care of a few little things over the past few days. Not a whole lot of time spent on the layout owing to a few other priorities, but did manage to hook up the loconet on the UP5’s to the command station and booster on Thursday evening, though I’ll definitely have more work cleaning up once a few more bits are finalized. Just need to run power to the panels and all will be good on that front.
And tonight, installed a handful of bullfrogs. I must admit, the install of these things is quite nice compared to tortoii, and can actually be done on ones own! A nice thing happened once the fifth one was installed; all turnouts currently installed now have a positive lock on the points. Might be a bit of a challenge actually changing said points, but still being able to move cars through turnouts without fear of half the car going one way while the other half takes a decidedly different route is a good thing.
Cheers!
November 5 & 6, 2011
So I will admit that the fluorescent fixture wasn’t entirely all my work. Most of it was, but Cam did provide some assistance. Once that task was done, he got to work on sanding (and in some spots, grinding) the cork into the shape we needed for the Victoria sub, just north of the Parksville junction switch. Once that chore was done and the evidence vacuumed up, he got to work with fitting track.
Meanwhile I was busy getting the three turnouts ready to go, which for one of them included getting it soldered together, and for all three, gluing up the skeletons to the quick sticks, cutting the isolation gaps for the frog and otherwise making them ready for the layout. We managed to get the storage track fitted together and pushed cars from the Parksville yard all the way into the helix, so in some respects, the connection has been made to join up all the track, however, the main track isn’t fully fitted, nor have we got anything really spiked down.
Murray also came up to inspect the progress and was quite pleased. I was certainly happy to have him up too.
Today was a slightly quieter day. I came downstairs with the intent of getting some other stuff done and accomplished:
- construction of the last bullfrog I have in stock. Need lots more though.
- built up another four boxcars. Easy kits too. Even better is the fact I obtained them for two or four bucks each. And then spent more than that per car on changing out couplers to kadee #58’s with whiskers and metal wheels…
- submerging three GP-9 shells in 99% isopropyl alcohol. I hope they don’t come out worse for wear…
- starting on a turnout for Buckley Bay.
Overall, a relatively nice and productive day.
Cheers,
Jon
July 31, 2011
Dan called this morning, saying he’d like to come over. I of course agreed and shortly after noon (only slightly delayed), he arrived and we got some wiring work done. He works for a demolition company and managed to salvage some good lengths of red, black, blue and white 12-14 gauge solid wire and donated them to my cause. So after ensuring all the wiring chase holes were drilled, we got to work on installing the wiring into the lower deck and the middle deck (despite the fact there’s no trackage installed yet).
Afterwards, the feeders were installed from the track and hooked up to the bus wire.
Cam arrived during this point and continued working on the trackage towards Buckley Bay. Mud Bay siding was completed as was a good portion of the trackage between what will be Buckley Bay and Mud Bay (around the base of the peninsula)
Afterwards, I fixed up a turnout – forgot to cut isolation gaps and install guard rails on the turnout at North Siding Switch Mud Bay – and then we hooked up the power pack to the bus wire. And then began the fun! Dan got the honours of running a really long train from the helix down to Mud Bay and beyond. Given the fact the train was way over length for the siding, we had some fun working the train back and forth to get the locomotives by all the cars and then back into the helix with the caboose on the tail end.
I now know that I need to get a fair number of couplers replaced as those crappy plastic couplers just don’t hold up to anything in the way of strain. Not that was any new knowledge in my opinion…I knew I needed to, but the need for work to the fleet of cars I’ve been acquiring over the years will now need to happen sooner than later…
Cheers!
Jon
Testing freight on newly laid trackage
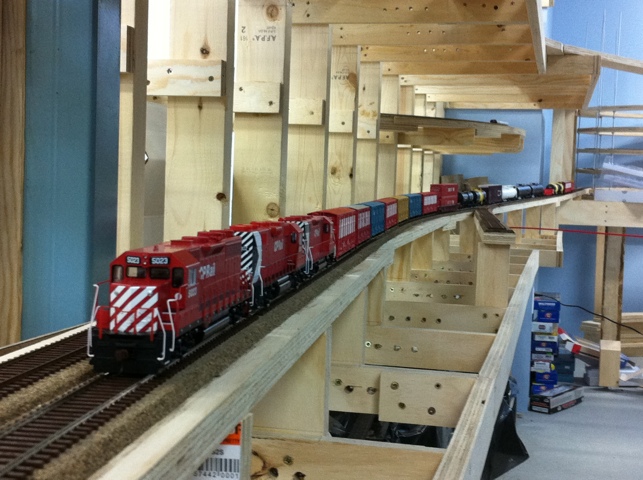
Cam and I assembled a good port alberni freight to test the helix. Successful!
July 30, 2011
Cam called this morning, invited me over to his place to review the drawings. A couple revisions and will get them scanned and posted to the website shortly. Then off to Home Depot for more plywood – a selection of 4″ and 6″ wide strips. Back to my place to get some stuff done. Cam worked on getting all the cork sanded and then started in on trackwork.
Doug S. came over shortly after to discuss with me the control panel for the Free-mo’s yard control panel and its design. Once that was all figured out we all went for lunch.
When Cam and I got back, more trackwork. For me, that meant prepping the fast tracks turnouts for install… Gluing on the quicksticks, cutting the isolation gaps for the frogs and electrically testing them for continuity (or more properly, lack therof). Cam installed the trackage on the lower deck, connecting into the helix and working towards Mud Bay.
I’m happy to report we have two turnouts installed! After we spiked down half of the main and siding at Mud Bay, we called the tracklaying to a halt (owing to tired butt syndrome) and grabbed some extra rolling stock, a couple more locos and tested a port freight up the helix. For the most part, a success!
Pictures to come…
Cheers!
Jon
June 25, 2011
I have two projects on the go right now in my basement. One of which is installing tortoises into the “centre crossover” section of Lindsay Yard for the Calgary Free-mo. The other project is the E&N, of course.
Dan called this morning and wanted to come over to do some work on the layout. When he got here, he found out about the first project and wanted to get some practice with wiring up tortoises. He’s likely installing a fair number of them on his layout when that gets going, and I didn’t see any reason why he couldn’t get some practice in now. So, with some advice, guidance and my tools, he got to work on those and voila. 8 tortoises ready for installation.
Cam came over a little after Dan started in on the tortoises and he and I got to work on the layout. Cam put in the last bits of cork on the Port Sub section on the middle deck, and then proceeded to grind the living daylights out of it to provide a level ramp off/on the cork for the transition from scenicked area to helix trackage which doesn’t have any cork. My Surform tool got quite a workout.
Following that, he got some trackage laid from the peninsula helix towards Parksville’s industrial area, only to find there were two concerns:
1) I didn’t have any micro-engineering joiners of suitable size. Apparently the code 83/100 Atlas rail joiners are just a little oversize for the code 70 track.
2) I didn’t have the curved #8 turnout for the Parksville team track built yet. At some point soon, I’ll tackle that project.
I did receive a full box of goodies from Fast Tracks via UPS earlier in the week and in it were 24 #6 quicksticks which I started making use of. Three turnouts are now virtually complete and ready for insertion into the layout after I spent the morning washing the turnout skeletons.
I also had a bit of a brainwave this morning and after explaining it to Cam and Dan, they readily agreed on the track revision. Northbound out of Wellington Siding, the trackage passes by ICG Propane and then curves again and into Bryn. Noting the mainline distance between Wellington and Bryn being well over 7-10 miles, I figured there should be a little bit more track between the two and used the space underneath the unloading ramp north of Parksville Junction to install a little more hidden trackage to increase the running length and improve the illusion of distance between the two places. Once Dan finished with the Tortoise wiring, we all got to work on getting the supports and subroadbed installed into place. The area formerly planned to be occupied by track will now likely be a whole ton of trees and perhaps a trail of some sort. We’ll see.
Also of note is the installation of the subroadbed and cork for Bryn. That’s all done now too.
Cheers!
Recent Comments