Modelling the E&N in HO Scale in my basement

Latest

February 26, 2011

For a few hours this morning, Cam came over to get some more progress with the layout. We finished off setting up the base for the main helix – putting a fair number more braces upon which we can secure the lowest rotation of the helix. One more leg to support the weight and the base is for all intents and purposes is done for now. We’ve also measured and marked out the rough location for the holes through which we’ll thread the ready-rod. Unfortunately, we can’t really go much further for the main helix as we need to ascertain the exact position for the entry into the helix from Parksville. And for that, we need to finish the one turn helix at the other end of the basement – the connection from Bryn to the Parksville Industrial area.

And that’s what we worked on following a work-related outing to go bowling at the Glencoe Club. So, we started attaching the first sections of the lower level of the helix to the benchwork. Our first bit of actual trackboard attached to the benchwork!


February 21, 2011

Plenty of progress again today! Cam and I got the first bits of trackboard cut (most of Bryn, and exit from Bryn northbound towards Parksville, installed the benchwork for the support of the Parksville industrial area, and prepped the wooden helix parts for installation – namely lining up everything and drilling holes for the ready rod. We also got a fair amount of the ready rod cut for use in the Parksville Helix. Still more of that to do, in addition to a full suite of pictures for the website. Will get to that over the next day or so.

February 20, 2011

So having the MacBook doing all the duties of updating the website is turning out to be a larger challenge than I thought. I still have yet to sync up the iPhone to the MacBook in iTunes, but at least I managed to sync up the photos! I’ve got them on the computer, but out of time to put them onto the page. Will get to that later. Today was a clean-up day – lots of sawdust to sweep up, vacuum and otherwise dispose of for further progress tomorrow! And oh yeah! Update the website!

February 19, 2011

Started the day by working more on the dispatcher’s desk, got the desktop cut to the proper shape and then went to work on the pair of panels to the left and right of the main board. I found out that I’m not terribly great at cutting a straight line on a 45° bevel with my jigsaw. 🙁 Would’ve been much easier to use a table saw if I had one… Those will get glued into place when we’re closer to being done with installing stuff around the end of the peninsula. We’re finding it quite handy to have access all around the work instead of from just one side.

Cam and Dan came over this afternoon and we got a lot more benchwork installed, including a fair amount of stuff around the end of the peninsula for both the lower and middle decks. We also mapped out on the floor the space required for the Parksville industrial area as well as getting more stuff figured out for the peninsula helix.


February 16, 2011

Peter Bouma sent me an email yesterday saying he’s got the three sheets of plywood and they’re all cut into 2″ wide strips (save for two which are 4″ for the helix base) and I managed to get some assistance from Dan to transport the wood up to my place as I’m without a vehicle which can hold 8′ long strips of wood in that quantity. Love the fact I’ve got a window into the basement which can take these things from the outside without having to manoever the awkward stuff through the stairway down into the basement!

February 6, 2011

Cam had an unexpected day off from visiting family and came over to do some minor bits of work with me on the layout. Chief among the things done was getting the helix base up off the floor and onto four 2×4 legs. I found some 4″ levelling feet and brackets typically used for Free-mo modules, but surplus to my needs and those went onto the legs for fine adjustment of the helix once we get more stuff built for it.

We also removed the masonite crossbracing from within the bulb at the end of the peninsula and replaced it with the start of a decent dispatcher’s desk. Several large scraps of 1/2″ Baltic Birch completely without use in the garage made their way into the basement to become the new crossbracing and start of a decent dispatcher’s desk. Height on the desk might be considered a little high, but works for either standing or sitting on a tall barstool. So far, all that’s installed today was the main sheet at the back of the desk, and a couple 2×4’s across the width of the area to support the desktop once I get it cut to proper shape.

The plan is for the most part still fixed, but we’re making more changes to the lower deck. Further thoughts by Cam, and agreed by yours truely was the deletion of the newly-added Tsable River bridge and replacement with the Trent River bridge towards the north end of the basement. Buckley Bay gets moved a bit towards the octogon and Union Bay gets the nod for an additional flagstop for the Dayliner.


February 5, 2011

35th birthday today for me, and I spent most of it downstairs with Cam and Dan Hamilton getting a lot of stuff built. We like to term it “boning the fish” for the sheer fact that when you look at the 2″ tall bits of plywood extending out from both sides of the central wall, it looks much like a fish skeleton. We stopped short of where we wanted to be for want of more 2″ wide strips of plywood, but still some fine progress made!

Cam and Dan also got a fair amount of the helix base assembled using 4″ wide strips of plywood, though it’s not complete for the lack of a few more cross-braces to be put in for riser support for the base rotation of the helix trackbed.

Afterwards, much fun was had at dinner Michaelea made and a game of Empire Builder was played until the wee hours including Murray who came over just as we were getting started. Dan left early and Michaelea took over his empire and Murray ended up winning (Beginners luck!) despite his promise to his wife that he would let me win… Oh well, at least it was a nice win this time around compared to some of his past wins which were… shall we say “not nice”?

January 30, 2011

So within the past couple weeks, I’ve had my primary computer (an Intel iMac, vintage 2006) fail completely on me, however, thanks to the fact the hard drive survived, I’m up and running on a MacBook with all the files intact. The photos for the last update may take some time to retrieve and then upload on the website. Same goes for future photos… (have to sync up my iPhone with the MacBook)

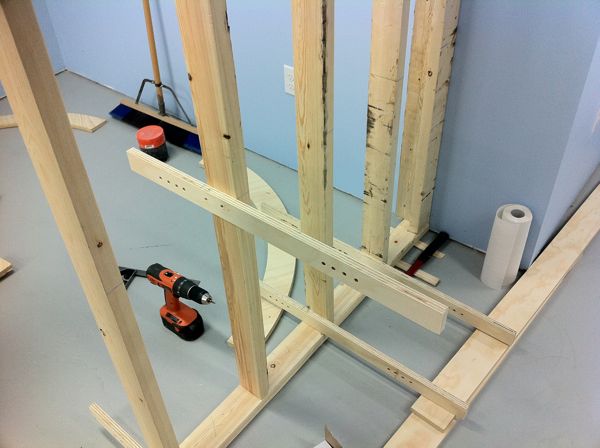
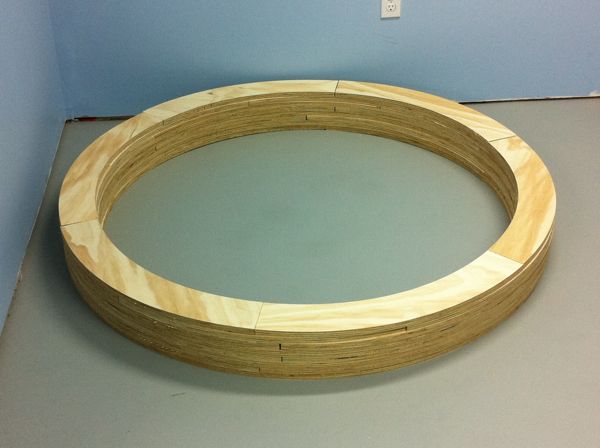
But progress is taking place. I’ve received the wood arcs from Goodship Lollipop (to the tune of 160 plus the cost of the sheets of plywood), the ready rod and some 400 nuts and washers for the helicies (yes, there will be two as per my update from the 5th), a handy digital level from Micro-Mark (amongst a few other goodies for the layout and modelling purposes), and the track from PWRS. Still needing code 70 “flex” track from Micro Engineering, but that will come before too terribly long.

Cam came over this morning and we figured more stuff out, and made a few decisions in terms of what’s being included on the lower deck of the layout, and what’s NOT being included. Specifically, we’re excluding Qualicum Beach from the layout, and more of what’s in between Mud Bay siding and Courtenay. What’s now included: Mud Bay siding. My October, 1988 CP Rail Timetable indicates it was a usable siding, so we may as well make use of it. There’s a ballast spur just to the south of it which will also be included for additional switching opportunities, especially when it comes to work trains. (After all, I do have a Sperry car which will be used every so often, and then the work trains follow afterwards!) I’m also deciding to model a couple of the larger river crossings on the lower deck as well, one of which is the Tsable River trestle. In it’s somewhat compressed version, it’ll occupy about 4 feet worth of length over a combination wood trestle, pin-connected truss and plate girder bridge. Should be fun to build. (Emphasis on “Should”!) Buckley Bay is moving around the corner and we’ll see if we can fit Dominion Tar and Chemicals into the switching scheme for more pole loading for the Courtenay turn. We may also try to fit another bridge (Nile Creek? Waterloo Creek?) into the mix as well. We’ll see.

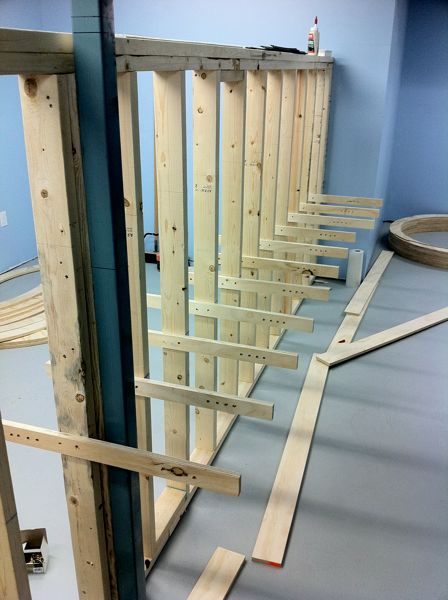
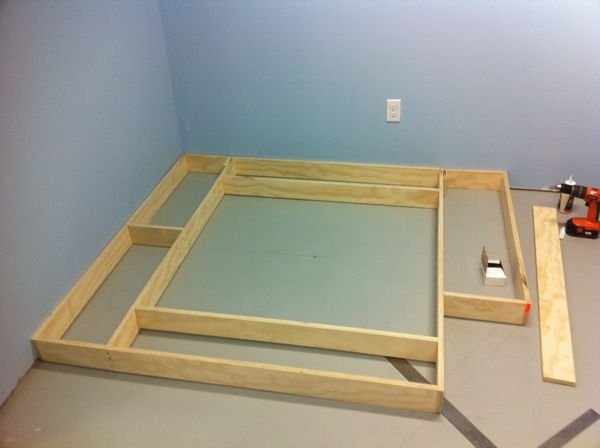
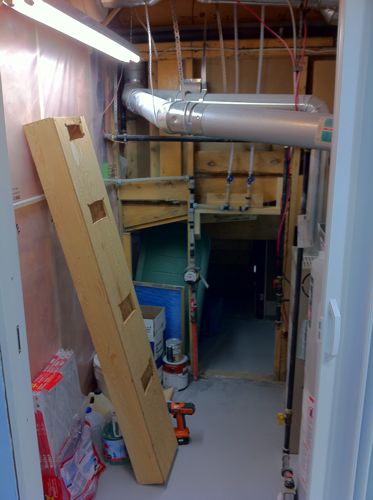
In any event, we got a few of the 2″ wide strips of 3/4″ plywood cut to lengths suitable for use as shelf brackets, but have yet to secure them into place as I need to acquire a long enough drill bit to drill through them for wire chases and the like. Next weekend marks my 35th birthday and hoping to have a few friends over to help get the first bits of benchwork installed on my layout.

Cheers!


January 5, 2011

Merry Christmas and Happy New Year!

So it’s been a little while since I last posted an update, but can say there’s been only a slight amount of progress towards the basement, due to family visiting and spending time with people who want to spend time with me. Life does have to spend some time out of the basement at some point y’know!

Anyhow, a few updates with photos and links to follow:

I’ve got the workbench area painted, and have been building a few code 83 turnouts (2 #6 regular and 1 #6 wye so far) for use within the wye leading to the workbench track. I’ve also taken advantage of PWRS’s sale on Atlas Code 83 flextrack and ordered a fair amount of it for use within the staging yard and helix. Should be showing up sometime reasonably soon. I’ll get the staging yard trackage done first most likely, though time will tell exactly how well that plan goes!

Cam and I also went to acquire several sheets of 3/4″ G1S plywood and had the helpful folks at Home Depot do the bulk of the cutting of the sheets into strips useful as “shelf brackets” of sorts for the trackage along the peninsula. We also got a few pieces cut for the staging yard and the major flat spots like Parksville. Several hours worth of debating, planning, etc. have led to a near final decision to build a 1 turn helix at the end of the peninsula to lengthen the run between Bryn and the Parksville industrial area (namely, the team track and National Silicates). A fair amount of 3D thinking to make sure that one decision doesn’t sink the chances elsewhere along the line.

Lastly, I spent a fair amount of time in both CadRail and Illustrator coming up with a plan to have “Goodship Lollipop” help us with building the helicies and corner segments. So for those not in the know (which would be everyone except Cam, Michaelea and myself), Goodship Lollipop is a company which owns two computer controlled cutting/routing tables. Basically, save me the pain and frustration of having to cut perfectly perpendicular corners on curved segments to build the helix pieces. Was a little expensive, but likely a lot less fustrating and less than doing them on a laser cutter. Thanks to Timothy Horton for giving me the inspiration to have a computer help me out with those bits. Onto the Bolt Supply House to get the ready rod and associated hardware to get the helix into a more 3 dimensional shape!

Cheers!

November 13, 2010

Today was the day everything got secured to the house! Cam came over late this morning and we put the wall up, securing it to the floor with ramset nails, wall with screws into a conveniently placed stud, and telepost with PL400 construction adhesive. I’ve now got a very stable peninsula wall dividing the basement for putting three decks of stuff up on it. It also marked the absolute END to any major changes to the track plan since I’m not going to pull nails which have been driven into concrete!

Turns out that square we drew on the floor for the peninsula-ending octogon was only a quarter inch out in one dimension from its final placement…Good stroke of luck there. Some shims for ensuring it was plumb and voila. Done. In the week leading up to the securing of the walls, I secured a sheet of hardened masonite into the octogon to provide for some cross bracing and then put a chair in there to envision dispatching from within the octogon. Turns out it’ll be a lot bigger in there than the workbench, and despite the crawl into the space once the layout is built, I’m thinking it’ll be a lot better in there than at the workbench… Cam suggested redoing the cross-bracing to provide a desk and proper setup within the octogon for dispatching which I’m inclined to agree with. There will of course be some changes taking place inside there to facilitate that. I’ll also need to acquire a fair number of FRS radios for the crews to properly communicate with the dispatcher. Any suggestions on what brand/make/etc.? Drop me an e-mail or post a comment on that or any other topic.

We also brought in a couple bits of pre-built benchwork for an aborted portion of Murray’s home layout which I acquired some time ago for use to see how they’ll work for the staging yard (as the height of these things are way taller than I’m allowing for the rest of the layout) and initial appearances look good. I’ll need new tops for both to fit the situation I’m in, but otherwise, a good recycling of the stuff.

And lastly, we got the workbench top fully installed. It was here that we pretty much decided to put the dispatcher inside the Octogon as Cam didn’t quite … fit in the space which means that I’m likely one of the few who will (and leaves me a pretty good incentive to not gain a whole ton of weight!) Now I’m looking to paint that too, but still deciding on whether it stays white or painted black with the rest of the wall.

And lastly, we secured the pair of water pipes leading to the outdoor faucets which were hanging down into the space intended for trains to enter the staging area.

Here’s a whole whack of pictures showing the entire basement with the new additions in place: