July 31, 2012
Spent the evening tonight doing a lot of cleaning up in the basement. Things were getting out of hand, messes were everywhere and for some reason, that one sweepstick (30″ radius) was still missing.
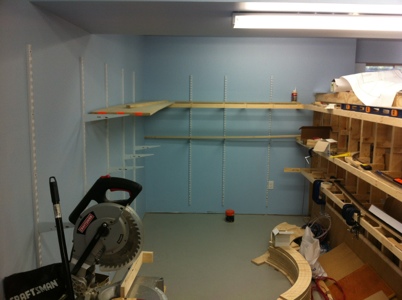
So, I used some of those shelf brackets, put them up fairly high up on the standards and put the 2″ strips of wood up there, additional standards yet to be installed and some of the additional strips of wood. The larger pieces all got consolidated as well out of the way and the floor thoroughly swept.
One could say I made a clean sweep, as I did locate the sweepstick on the floor.
Oh yeah, the other major change was the moving of the chop saw. For quite some time, it resided up against the wall that was soon to have benchwork installed on it. It’s now in front of Bryn, with a sheet of plastic stretched across the three decks behind the chop saw to protect it from flying debris and a whole ton of sawdust.
All this done to facilitate more work this upcoming long weekend!
Cheers!
July 28, 2012
Went out on Saturday to make some additional acquisitions. Another few hundred dollars later, I have some more plywood (3/4″ Birch, G2S, at Windsor Plywood for all of $30 per sheet), additional shelf standards and Brackets (found them much less expensive at Lee Valley, and they’re interchangeable with the existing stuff I bought at Home Depot) and a box of cork.
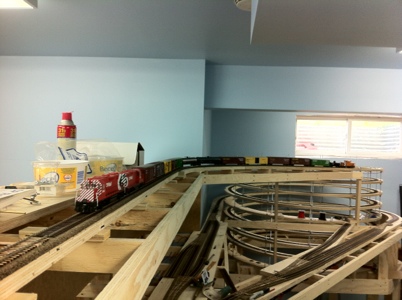
Cam and I got back to the house and after hauling it all downstairs (actually, it was brought in through the side window in the basement) and proceeded to pull up existing roadbed and track. Yes… You read that correctly. We did some checks, measurements and found we needed a little more length for the Trent River Bridge and I didn’t necessarily like having to go with partially visible 26″ radius curves… So we did what we did up one deck and curved the train behind the backdrop to hide it for a little bit and compress more mileage into hidden track. Needed to pull up one string of flex and also the roadbed underneath to make the corner.
And that’s about where we ended up finishing for the day. More work to come next weekend!
July 22,2012
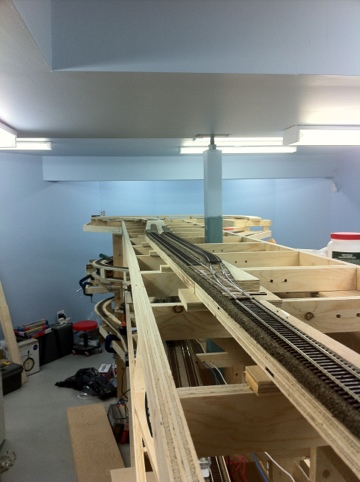
Cam came over early this afternoon to help on some more progress on the benchwork for the layout. Primarily woodwork surrounding the shelf brackets on the end-wall where ICG in Nanaimo, the Trent river bridge, and the entry into Port Alberni.
And with that work, I’m now pretty much out of my 2″ strips of 3/4″ plywood. Now I really am needing virtually everything!
July 21, 2012
So I’ve been stuck for quite a while in the benchwork department, and today, we’ve made pretty decent progress!
After checking out the offerings from Rona, Lowes and Home Depot, Cam and I settled on 70″ tall white Rubbermaid dual track standards, bought 8 of them, and a couple boxes of 11.5″ brackets (32).
After a spot of lunch, Dan came over to help with the fun of installing the standards with Cam and I. Numerous screws secured the standards into the wall and we now have the ability to carry track boards half way to Courtenay, well into the Nanaimo switching zone and halfway into the Port Alberni Yard. Now I just need more of virtually everything. 🙂
July 15, 2012
Saturday, went down to see Bruce (The Dispatcher) to pick up the first of the circuit breakers for the layout, a DCC Specialties PSX-4. Lots of good reviews for this and the unit will certainly help keep the bulk of the layout running when derailments and switches being run through short out the district.
Cam came over and we worked on getting things at the Booster Shelf cleaned up and sorted out to get the circuit breaker installed. Owing to the PSX-4’s rather large size, we had to build a secondary shelf to hold the power supplies for the boosters, and that allowed lots of things to be organized.
I’ll be ordering a couple PSX-3’s to subdivide the outputs from the other two boosters shortly, and here’s how the sub-districts will work out:
| Output | 1 | 2 | 3 |
| A | Parksville | Port Alberni | Upper Helix |
| B | Bryn | Arrowsmith | Lower Helix |
| C | Courtenay | Nanaimo | Staging Yard |
| D | Mud Bay | N/A | N/A |
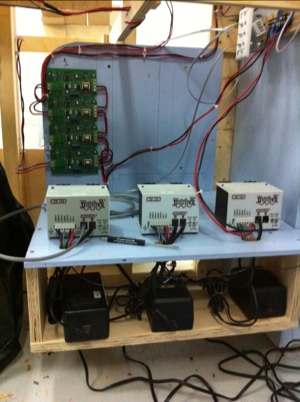
Here’s a picture of how it’s set up for the moment. The blue wall immediately to the right of the green circuit board (PSX-4) is where the PSX-3’s will go. Starting to look somewhat organized! Too bad I didn’t think to take a picture before we started on all this… Oh well, hindsight is 20/20, right?
July 2, 2012
Happy Canada Day!
A little belated to be sure, but I was offline (aka camping in an area without cell coverage) for the bulk of the weekend.
Came home last night festooned with mosquito bites and a few sunburnt areas and the cool basement was calling out to me. Naturally, I heeded the call, went downstairs and built a couple bullfrogs, spiked down about nine feet of track (the remainder of the main and siding at Arrowsmith) and put a few spikes into the turnout at the west end of the Arrowsmith siding. I also installed and tested the bullfrogs.
June 25, 2012
Cam called early this afternoon, said he had taken a couple days off work so he could not be at work on his birthday (the 26th, happy birthday!).
Asked what I was up to, I replied that I was making dinner and then headed downstairs to do some work on the layout and invited him over to take in the fun. So he did.
We pulled rolling stock out of Parksville and sanded the cork to the MP25 trestle location and then proceeded to fit track for the remainder of the Arrowsmith storage track and a few feet beyond. The other switch was also put into place.
We would’ve spiked it down and soldered various bits but it was getting late by then and I called it a night.
I’ll get the track spiked down sometime next week and wire up the track to a yet-to-be-installed bus but I’m definitely needing to find some dough to enable some more purchases… Specifically track, cork, benchwork material, and of course those shelf brackets!
At least in the meantime I can run a train to Arrowsmith…
June 24, 2012
Didn’t do much over the course of the weekend than acquire some Peco rail joiners on Saturday, and try to apply some firmware updates to the DT402D throttle and the UR92. The former was successful, the latter…. Well, let’s say the upgrade downgraded the functionality to nil.
A message has been sent to Digitrax and I’ll hopefully find out soon whether I’m sending it on a vacation to Florida. I suppose it’s not a really bad thing as I’ve still got a couple throttles to send down for repair/upgrading…and I should get some more trackwork going too.
June 20, 2012
Fitted and spiked down two 3′ long sticks of Flex last night… One for the siding and one for the main connected to the east siding switch at Arrowsmith.
Debated whether I sand the cork to enable more track to be laid and decided to do that another time.
June 18, 2012
I debated on whether I should even post a note about this, and ended up deciding to go ahead.
Last night, after considerable searching for rail joiners, spiked down the east siding switch for Arrowsmith. I also got a couple lengths of flex prepared for spiking down.
That is all.
June 17, 2012
And there ya have it. After a very lengthy wait, we finally have a train at the current end of track – the east siding switch of Arrowsmith. The train of course made it up the hill under its own power, and made obvious the need to fully check the trip pins on the cars I’m running. A couple candidates are those which derailed on the way up on account of the screws holding the track down.
By the way, this is the first train to run on the layout in many months… So happy to hear those units once again.
June 14, 2012
Spent a little bit of time in the basement last night, working on finishing feeders and busses in the helix. Got the upper helix red wire completed, strung the black (and found that length of wire is about 4″ too short…) and finished off all the feeders to both track and their ready-rod connections.
During all this, I’ve got one of my older iPods playing music. One song came on that I didn’t care to hear, so out I went to remedy the situation. I stood up a little too early…
Ow. Ow. Ow.
The bridge from Parksville to the lower deck had (emphasis on had) a UP5 mounted to the bottom of it, screwed in on the top pair of holes. I had stood up right into this poor piece of aluminum, bent the living daylights out of it, and in return it fought back, tearing a very loved shirt (obtainable only at the Apple company store at their worldwide headquarters in Cupertino, CA) and putting a couple good gashes into my back.
I’m now seriously contemplating a decision to go completely wireless for the throttles…
June 4, 2012
Holy. Crap.
It’s been how long since I’ve made an entry on this blog or done any meaningful work on the layout?!?
Apart from the prototype being given funding to survive (though a few extra million for bridges is now necessary for freight service), I haven’t done anything in the basement or written anything on this blog for virtually four months… And granted, the work done over tonight and last night isn’t much, it is progress.
So I started out by doing some cleaning. Always a good thing to do, especially when one is trying to figure out what to do next. Leaves one better prepared to actually do the work, rather than get frustrated at the fact you want to do something but can’t because of crap getting in the way. Swept the floor near the chopsaw, took care of a few bits of stuff that didn’t need to be there (like a top panel for a washing machine I no longer own…though it might actually come in handy at some point like a magnet board perhaps…) and organize some of the tools. Didn’t get as far as I should have, but progress nonetheless.
Then over to do some wiring work near the helix and the port sub. Realized I needed some height to work on those spots and set out to find a step stool. Except I didn’t have a milk crate to stand on or anything else that would substitute.
So I decided to do something to a dear piece of woodworking my brother built in shop class back when I was in high school… For those who know me, that’s a good 18+ years ago. It was a small-ish table, still on the tall side, with a small shelf underneath the main top. Nothing too fancy, but wood wrapped the edges of the plywood and solid wood for legs. Varathane on most surfaces.
Yes, I tore it apart.
It was getting rather beat up, and had served it’s purpose well. Most of the time it held my spraybooth, then during the construction of the layout, it’s been a collector of various tools for drywalling.
I took the top off, will repurpose it as a shelf somewhere, and then took the smaller shelf and removed it from the legs and tore the legs all apart. Most of that was easy given the fact it was broken already. Sawed 12″ pieces out of the legs (ruining the clean floor I just had) and then glued/screwed them to the four corners of the smaller shelf and voila. A step stool that’s both light and tall enough to allow me to whack my head against light fixtures and the ceiling. Not that I plan on doing that…
So while I’m up there drilling feeder wire holes for the track leading up to Arrowsmith siding, I’m still wracking my brain as to how I can efficiently get power to the ready rods and light up all the feeders I’ve lovingly wired to the track. And then I start to experiment.
The feeders hooked up already to the ready rods are with big ring terminals. A couple snips and they insert between the internal tooth lock washers really easy. Problem with using them is that it still requires a T joint and tiny wire – 18ga at best to make the connection to the bus which I’m using 12ga solid wire for. And then it dawns on me that I could make a few modifications to them and save myself a bit of work and a lot of extra connections. Here’s how:
- take one crimp, and hold it by the ring very firmly in a pair of pliers.
- using a sharp xacto knife, slice the plastic off the crimp.
- using small needle nosed pliers, open up the little hoop so it becomes a flat piece of metal. Use pliers and/or a hammer and the concrete floor to make the entire piece very flat.
- using pliers, bend the tab up and back towards the ring in a hook that will hold the wire passing by perpendicular to the ring.
- strip and solder the terminal to the wire and attach to the ready rod the same way I attach the others.
I’ll post pictures when I have a complete setup, but that I think will solve a lot of issues and make for a neat way to do up the wiring to the ready rod, likely on Wednesday or Thursday evening.
Nice to be back into this thing…
Completely unrelated to the model railway
I suppose this is worthy enough of a post, even though the only times I’ve been down to the basement over the past while were to access the contents of the fridge and freezer at the base of the stairs…
The Southern Railway of Vancouver Island and it’s owner, the Island Corridor Foundation, have managed to convince the Federal and Provincial governments to buck up the 15 million to do enough rehabilitation to the railway’s Victoria Sub to reinstate the Dayliner service. Initially, it’ll run from Nanaimo to Vic West – owing to the removal of the Blue Bridge into Victoria, the railway won’t serve Victoria proper again – but in time, I’m hoping the line all the way to Courtenay will see passenger service again.
It would be a very unsafe bet to make that I don’t travel out to Vancouver Island to ride the train when it comes back into service!
I’m exceedingly happy about this news!
March 25, 2012
I’m sure you’ve visited the blog at least once or twice in the past month wondering whether I’m still alive.
Yes, I am. Apologies but as of late, haven’t really had much time. Been busy with getting things ready to go for SUPERTRAIN (I do the design work for all the printed materials, so it’s been a fair bit of work) and just haven’t had any ability/inclination to head downstairs.
Once the show wraps up, will likely head back down to get some more done.
Jon
February 19 & 20, 2012
I have an 8″ wide by 8′ sheet of 3/4″ plywood which unexpectedly got designated as a ‘holder of stuff’… Glue, contact cement, foam brushes, and various tools that never quite seem to make it back into the toolbox, but yet rarely used. It first started out on the benchwork that initially became Bryn, and when Bryn’s track was laid, we moved that sheet down. And then we moved it up when we laid track to Union Bay.
Well, this weekend we needed to move the shelf once again…This time to where we can keep it until scenery starts!
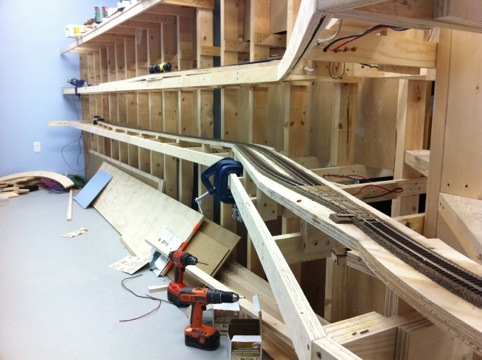
Cam came over on Saturday and Sunday and we finished off the trackwork out of the helix (yay! All helicies are done for trackwork!) and laid track to Arrowsmith siding. I hastily built a couple turnouts for the siding and then we got to benchwork. And did we ever go far!
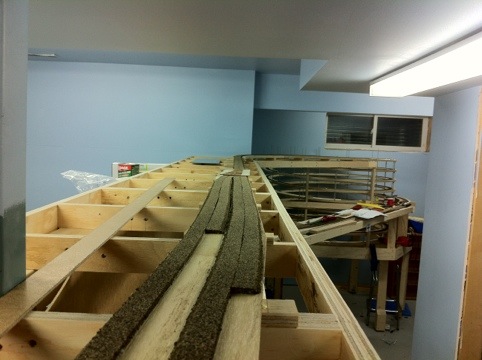
Wrapped all the way around the end of the peninsula, and down the hill towards Port Alberni. Of particular interest is the fact it’s all supposed to be on a 1.7% grade from just past Arrowsmith all the way down to Port Alberni. I fully expect the port freight to really work but it’s going to be able to do the job without doubling the hill on account of the helix being a much heavier (and curvier) grade than the run up to the summit.
You’ll note I said “supposed to be”… Well, with what tools we possess, a digital angle indicator from Micromark, a really good vernier caliper and several levels and a pair of programs called “RiserCalc” and “GradeCalc”, we tried as best we can to make sure the risers are all at the correct height, cross-level and we still didn’t quite nail it. Some spots are a little steeper, and some less so. In the end, the digital level was discarded and the math made the grade. Looks pretty good.
When it came time to plan for how we’re going to incorporate Rogers Creek siding, we found a few things that didn’t quite work. Specifically, how to get a wider track spacing on the pieces of 4″ wide curved plywood… It would’ve required a sharper mainline radius, or purchasing another sheet of plywood and making poor use of it. In the end, we’re going to delete the siding from the plan on that plus the fact it would all be on a grade. Much as I’d like to have working handbrakes on my rolling stock, I just don’t see it in the cards, and I’m not one for sticking a pin up into the axles of cars to keep them on the grade in the siding.
At some point I’m going to need to get some dough and get going on the shelf standards and shelf brackets… I’m running out of benchwork I can build on!
Cheers!
February 12, 2012
A wonderful day!
Cam came over shortly after noon and we got started on working the track further up the helix. I had prepped the last few pieces of the benchwork earlier but Cam did the final adjustments before securing the track down.
After a bit of lunch, Dan joined us and we started working on the benchwork out of the helix towards Arrowsmith. After prepping a little more cork than necessary, we pressed on with the benchwork fully into Arrowsmith siding (admittedly, it was more of a storage track than an actual siding in 1988.) to be able to use up the cork.
I also cut off the top of a few ready rods close to where the track exits out of the helix.
A great day of progress!
January 28, 2012
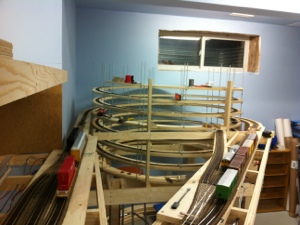
And more helix! The port sub helix is now a couple turns taller after a good afternoon of Cam and I working away at the benchwork, track and wiring. One more full rotation for the track and we’ll be exiting the helix and towards the summit. And it all goes downhill from there!
January 21, 2012
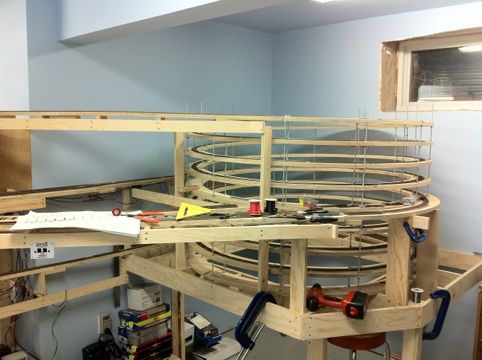
In some respects, building a helix requires quite a few things to be done nearly all at the same time.
Such was the case when Cam came over to get some stuff done on the layout. Since we’ve pretty much done everything on the lower and middle decks, we started in on the upper helix to carry the track up towards the summit of the Port Alberni subdivision. We managed within the space of about two hours to wrap the benchwork around a revolution and a half, and a little over a half turn on the track.
And on a completely different topic…
I downloaded Google’s SketchUp, with the intent of learning how to model the stations along the line digitally in the effort of having the pieces laser cut, making the assembly effort to be better and hopefully produce a better finished piece.
We’ll see how things go…
January 13, 2011
Over the past week, spent time downstairs finishing up the wiring to the track laid.
So to date, all the bullfrogs are wired, the track has been wired.
Next up will be the helix up to the upper deck and to Arrowsmith siding and the grade down to Port Alberni!
January 9, 2012
Really quick update: drilled holes for feeders from Mud Bay siding through to end of track on the lower deck, dropped feeders into all of them and then hook up quite a few of them to the track before I ran out of juice…
January 8, 2012
Earlier this morning, decided to go downstairs and do some troubleshooting. Specifically, wireless troubleshooting. Quite a few months ago, came across a deal that I really couldn’t pass up: an older, radio equipped digitrax empire builder starter set, slightly used, complete with a DT400R throttle, DB150 booster, power supply and a UR91 radio reciever. Realistically, I could do without the first three as I already had them, but could definitely make use of them all. The last item was a missing link so to speak for operators who had a DT400R throttle. Without the UR91, their throttles would be missing major functionality.
And our testing of it from prior to the open house seemed to indicate the UR91 was a dud and needing a Florida vacation.
Well, this morning I tried the one throttle we received with the set, and had no luck. Then checked Loconet. All good. Then I tried another throttle and voila. The locos started responding. I relayed the results back to Cam and he brought his throttle (a DT400R) and play…err, tested it as well. No major issues there either. So I’ve got throttles to send on a trip to Digitrax for repairs and the UR91 stays put…well, maybe. I’m still not sold on it’s location for now…
Later this evening, went back downstairs and threaded and spliced in another section of bus wire, under the newly laid trackage between Buckley Bay and Union Bay, planned the feeder locations from Mud Bay through to the end of trackage and called it a night.
Cheers!
January 2, 2012
Today saw the finishing of the turnout for Buckley Bay, the laying of track up to Union Bay, and the building and install of the bullfrog controlling the Buckley Bay turnout.
Of note with the track between Buckley Bay and union bay is the loose bit of track. No spikes, no soldering of the rail joiners. Possibly no feeders either.
It’s in preparation of the install of the bridge over Hindoo Creek, a short 15-tie long bridge, where we have some room to install bridges.
For the most part, the benchwork doesn’t allow for many bridges, owing to the lack of vertical clearance. Such was the fate for the Englishman River Bridge, but being on the lower deck, space below allows for these scenic features.
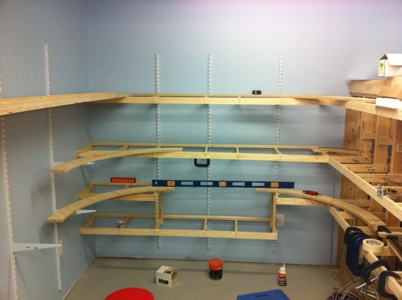
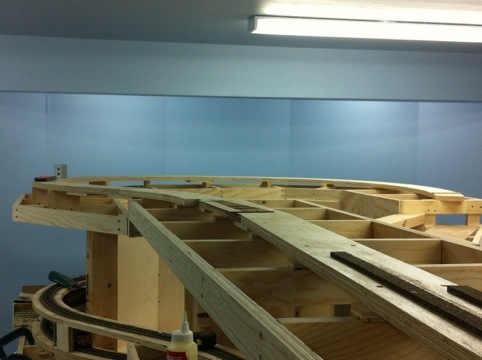
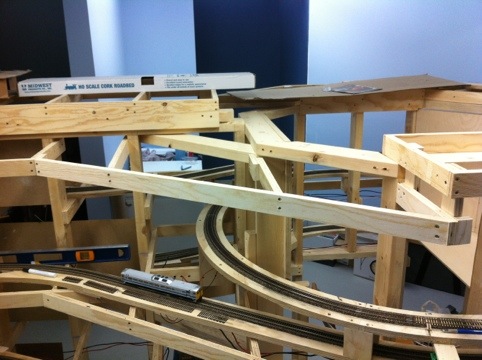
Also of some importance to the list of things done yesterday, and while we’re on the topic of bridges, is the install of the final bit of benchwork between the end of the peninsula and the straight stretch of grade into Port Alberni. Cam and I left this for a while trying to figure out how to handle the several inch drop from the benchwork around the top of the peninsula to the bit that was installed at the same height as Port Alberni itself. The benchwork was installed to be level with the port alberni height and one giant leap up to the next level. The extra clearance will allow for the install of the trestle around mile 25 of the Port sub. Here’s a picture of said benchwork. The high spot is on the right.
With the near completion of the trackage on the lower two levels of the peninsula, efforts will now start towards the completion of the main helix and trackage towards Port Alberni. About time we started paying attention to the Port Sub, beyond the little bit around the Parksville area…
Cheers!
January 1, 2012
Spent a little bit of time today on the Buckley Bay / Union Bay roadbed today, primarily getting the cork laid down. Also nearly completed the turnout for Buckley Bay spur as well. Should be able to lay some track down tomorrow and wire it up for operation. One of the nice things with single track territory is that it lays down nice and quick!
Oh yeah, happy new year!
Recent Comments